Quantcast
Channel: Bartek's coding blog
Viewing all 325 articles
Browse latest View live

Errata and a Nice C++ Factory Implementation

$
0
0

I've finally got my copy of "Effective Modern C++"! The book looks great, good paper, nice font, colors... and of course the content :)

While skimming through it for the first (or second) time I've found a nice idea for a factory method. I wanted to test it.

The idea

In the Item 18 there was described how to use std::unique_ptr and why it's far better than raw pointers or (deprecated) auto_ptr.

As an example there was a factory presented:

template<typename... Ts> 
std::unique_ptr<Investment>
makeInvestment(Ts&&... params);

Looked nice! I thought, that I would be able to return unique pointers to proper derived classes. The main advantage: variable count of parameters for construction. So one class might have one parameter, another could have three, etc, etc...

I've quickly create some code:

template <typename... Ts> 
static std::unique_ptr<IRenderer>
create(const char *name, Ts&&... params)
{
std::string n{name};
if (n == "gl")
return std::unique_ptr<IRenderer>(
new GLRenderer(std::forward<Ts>(params)...));
else if (n == "dx")
return std::unique_ptr<IRenderer>(
new DXRenderer(std::forward<Ts>(params)...));

return nullptr;
}

But then when I tried to use it:

auto glRend = RendererFactory::create("gl", 100);
auto dxRend = RendererFactory::create("dx", 200, DX_11_VERSION);

It did not compile...

gcc 4.9.1:
factory.cpp:28:7: note: constexpr GLRenderer::GLRenderer(GLRenderer&&)
factory.cpp:28:7: note: candidate expects 1 argument, 2 provided

There is no way to compile it. All constructors would have to have the same number of parameters (with the same types).

Errata

Then I've found errata for the book: Errata List for Effective Modern C++

The makeInvestment interface is unrealistic, because it implies that all derived object types can be created from the same types of arguments. This is especially apparent in the sample implementation code, where are arguments are perfect-forwarded to all derived class constructors.

hmm... that would be all.

Such a nice idea, but unfortunately will not work that way.

It was too beautiful to be true :)

I probably need to dig more into abstract factories, registration, etc. Two interesting questions from Stack Overflow:


Persistent Mapped Buffers in OpenGL

$
0
0

It seems that it's not easy to efficiently move data from CPU to GPU. Especially, if we like to do it often - like every frame, for example. Fortunately, OpenGL (since version 4.4) gives us a new technique to fight this problem. It's called persistent mapped buffers that comes from the ARB_buffer_storage extension.

Let us revisit this extension. Can it boost your rendering code?

Note:
This post is an introduction to the Persistent Mapped Buffers topic, see
the Second Part with Benchmark Results

Intro

First thing I'd like to mention is that there is already a decent number of articles describing Persistent Mapped Buffers. I've learned a lot especially from Persistent mapped buffers @ferransole.wordpress.com and Maximizing VBO upload performance! - javagaming.

This post serves as a summary and a recap for modern techniques used to handle buffer updates. I've used those techniques in my particle system - please wait a bit for the upcoming post about renderer optimizations.

OK... but let's talk about our main hero in this story: persistent mapped buffer technique.

It appeared in ARB_buffer_storage and it become core in OpenGL 4.4. It allows you to map buffer once and keep the pointer forever. No need to unmap it and release the pointer to the driver... all the magic happens underneath.

Persistent Mapping is also included in modern OpenGL set of techniques called "AZDO" - Aproaching Zero Driver Overhead. As you can imagine, by mapping buffer only once we significantly reduce number of heavy OpenGL function calls and what's more important, fight synchronization problems.

One note: this approach can simplify the rendering code and make it more robust, still, try to stay as much as possible only on the GPU side. Any CPU to GPU data transfer will be much slower than GPU to GPU communication.

Moving data

Let's now go through the process of updating the data in a buffer. We can do it in at least two different ways: glBuffer*Data and glMapBuffer*.

To be precise: we want to move some data from App memory (CPU) into GPU so that the data can be used in rendering. I'm especially interested in the case where we do it every frame, like in a particle system: you compute new position on CPU, but then you want to render it. CPU to GPU memory transfer is needed. Even more complicated example would be to update video frames: you load data from a media file, decode it and then modify texture data that is then displayed.

Often such process is referred as streaming.

In other terms: CPU is writing data, GPU is reading.

Although I mention 'moving', GPU can actually directly read from system memory (using GART). So there is no need to copy data from one buffer (on CPU side) to a buffer that is on the GPU side. In that approach we should rather think about 'making data visible' to GPU.

glBufferData/glBufferSubData

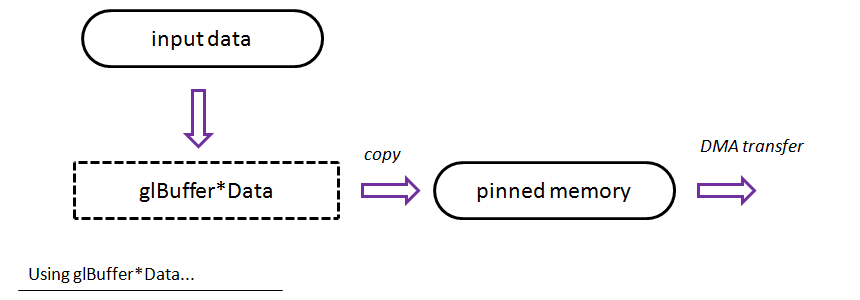
Those two procedures (available since OpenGL 1.5!) will copy your input data into pinned memory. Once it's done an asynchronous DMA transfer can be started and the invoked procedure returns. After that call you can even delete your input memory chunk.

The above picture shows a "theoretical" flow for this method: data is passed to glBuffer*Data functions and then internally OpenGL performs DMA transfer to GPU...

Note: glBufferData invalidates and reallocates the whole buffer. Use glBufferSubData to only update the data inside.

glMap*/glUnmap*

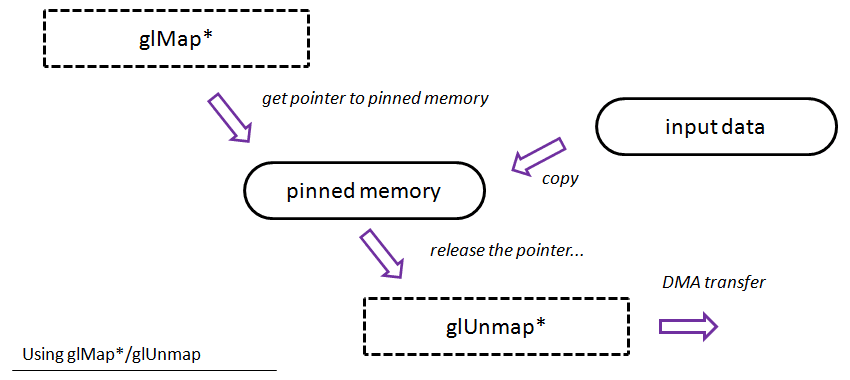
With mapping approach you simply get a pointer to pinned memory (might depend on actual implementation!). You can copy your input data and then call glUnmap to tell the driver that you are finished with the update. So, it looks like the approach with glBufferSubData, but you manage copying data by yourself. Plus you get some more control about the entire process.

A "theoretical" flow for this method: you obtain a pointer to (probably) pinned memory, then you can copy your orignal data (or compute it), at the end you have to release the pointer via glUnmapBuffer method.

... All the above methods look quite easy: you just pay for the memory transfer. It could be that way if only there was no such thing as synchronization...

Synchronization

Unfortunately life is not that easy: you need to remember that GPU and CPU (and even the driver) runs asynchronously. When you submit a draw call it will not be executed immediately... it will be recorded in the command queue but will probably be executed much later by GPU. When we update a buffer data we might easily get a stall - GPU will wait while we modify the data. We need to be smarter about it.

For instance, when you call glMapBuffer the driver can create a mutex so that the buffer (which is a shared resource) is not modified by CPU and GPU at the same time. If it happens often, we'll lose a lot of GPU power. GPU can block even in a situation when your buffer is only recorded to be rendered and not currently read.

In the picture above I tried to show a very generic and simplified view of how GPU and CPU work when they need to synchronize - wait for each other. In a real life scenario those gaps might have different sizes and there might be multiple sync points in a frame. The less waiting the more performance we can get.

So, reducing synchronization problems is an another incentive to have everything happening on GPU.

Double (Multiple) buffering/Orphaning

Quite recommended idea is to use double or even triple buffering to solve the problem with synchronization:

  • create two buffers
  • update the first one
  • in the next frame update the second one
  • swap buffer ID...

That way GPU can draw (read) from one buffer while you will update the next one.

How can you do that in OpenGL?

  • explicitly use several buffers and use round robin algorithm to update them.
  • use glBufferData with NULL pointer before each update:
    • the whole buffer will be recreated so we can store our data in completely new place
    • the old buffer will be used by GPU - no synchronization will be needed
    • GPU will probably figure out that the following buffer allocations are similar so it will use the same memory chunks. I remember that this approach was not suggested in older version of OpenGL.
  • use glMapBufferRange with GL_MAP_INVALIDATE_BUFFER_BIT
    • aditionally use UNSYNCHRONIZED bit and perform sync on your own.
    • ​there is also a procedure called glInvalidateBufferData​ that does the same job

Triple buffering

GPU and CPU runs asynchronously... but there is also another factor: the driver. It may happen (and on desktop driver implementations it happens quite often) that the driver also runs asynchronously. To solve this, even more complicated synchronization scenario, you might consider triple buffering:

  • one buffer for cpu
  • one for the driver
  • one for gpu

This way there should be no stalls in the pipeline, but you need to sacrifice a bit more memory for your data.

More reading on the @hacksoflife blog

Persistent Mapping

Ok, we've covered common techniques for data streaming, but now, let's talk about persistent mapped buffers technique in more details.

Assumptions:

  • GL_ARB_buffer_storage must be available or OpenGL 4.4

Creation:

glGenBuffers(1, &vboID);
glBindBuffer(GL_ARRAY_BUFFER, vboID);
flags = GL_MAP_WRITE_BIT | GL_MAP_PERSISTENT_BIT | GL_MAP_COHERENT_BIT;
glBufferStorage(GL_ARRAY_BUFFER, MY_BUFFER_SIZE, 0, flags);

Mapping (only once after creation...):

flags = GL_MAP_WRITE_BIT | GL_MAP_PERSISTENT_BIT | GL_MAP_COHERENT_BIT;
myPointer = glMapBufferRange(GL_ARRAY_BUFFER, 0, MY_BUFFER_SIZE, flags);

Update:

// wait for the buffer   
// just take your pointer (myPointer) and modyfy underlying data...
// lock the buffer

As name suggests, it allows you to map buffer once and keep the pointer forever. At the same time you are left with the synchronization problem - that's why there are comments about waiting and locking the buffer in the code above.

On the diagram you can see that in the first place we need to get a pointer to the buffer memory (but we do it only once), then we can update the data (without any special calls to OpenGL). The only additional action we need to perform is synchronization or making sure that GPU will not read while we write at the same time. All the needed DMA transfers are invoked by the driver.

The GL_MAP_COHERENT_BIT flag makes your changes in the memory automatically visible to GPU. Without this flag you would have to manually set a memory barrier. Although, it looks like that GL_MAP_COHERENT_BIT should be slower than explicit and custom memory barriers and syncing, my first tests did not show any meaningful difference. I need to spend more time on that... Maybe you some more thoughts on that? BTW: even in the original AZDO presentation the authors mention to use GL_MAP_COHERENT_BIT so this shouldn't be a serious problem :)

Syncing

// waiting for the buffer
GLenum waitReturn = GL_UNSIGNALED;
while (waitReturn != GL_ALREADY_SIGNALED && waitReturn != GL_CONDITION_SATISFIED)
{
waitReturn = glClientWaitSync(syncObj, GL_SYNC_FLUSH_COMMANDS_BIT, 1);
}

// lock the buffer:
glDeleteSync(syncObj);
syncObj = glFenceSync(GL_SYNC_GPU_COMMANDS_COMPLETE, 0);

When we write to the buffer we place a sync object. Then, in the following frame we need to wait until this sync object is signaled. In other words, we wait till GPU processes all the commands before setting that sync.

Triple buffering

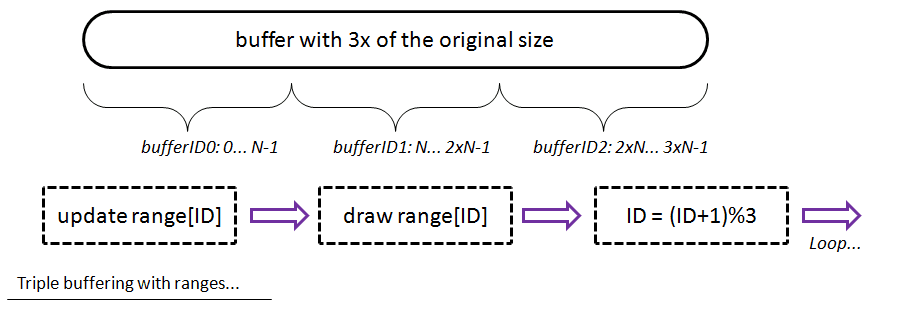
But we can do better: by using triple buffering we can be sure that GPU and CPU will not touch the same data in the buffer:

  • allocate one buffer with 3x of the original size
  • map it forever
  • bufferID = 0
  • update/draw
    • update bufferID range of the buffer only
    • draw that range
    • bufferID = (bufferID+1)%3

tripe buffering approach

That way, in the next frame you will update another part of the buffer so that there will be no conflict.

Another way would be to create three separate buffers and update them in a similar way.

Demo

I've forked demo application of Ferran Sole's example and extended it a bit.

Here is the github repo: fenbf/GLSamples

  • configurable number of triangles
  • configurable number of buffers: single/double/triple
  • optional syncing
  • optional debug flag
  • benchmark mode
  • output:
    • number of frames
    • counter that is incremented each time we wait for the buffer

Full results will be published in the next post: see it here

Summary

This was a long post, but I hope I explained everything in a decent way. We went through standard approach of buffer updates (buffer streaming), saw our main problem: synchronization. Then I've described usage of persistence mapped buffers.

Should you use persistent mapped buffers? Here is the short summary about that:

Pros

  • Easy to use
  • Obtained pointer can be passed around in the app
  • In most cases gives performance boost for very frequent buffer updates (when data comes from CPU side)
    • reduces driver overhead
    • minimizes GPU stalls
  • Advised for AZDO techniques

Drawbacks

  • Do not use it for static buffers or buffers that do not require updates from CPU side.
  • Best performance with triple buffering (might be a problem when you have large buffers, because you need a lot of memory to allocate).
  • Need to do explicit synchronization.
  • In OpenGL 4.4, so only latest GPU can support it.

In the next post I'll share my results from the Demo application. I've compared glMapBuffer approach with glBuffer*Data and persistent mapping.

Interesting questions:

  • Is this extension better or worse than AMD_pinned_memory?
  • What if you forget to sync, or do it in a wrong way? I did not get any apps crashes and hardly see any artifacts, but what's the expected result of such situation?
  • What if you forget to use GL_MAP_COHERENT_BIT? Is there that much performance difference?

References

Persistent Mapped Buffers, Benchmark Results

$
0
0

In part 2 of the article about persistent mapped buffers I share results from the demo app.

I've compared single, double and triple buffering approach for persistent mapped buffers. Additionally there is a comparison for standard methods: glBuffer*Data and glMapBuffer.

Note:
This post is a second part of the article about Persistent Mapped Buffers,
see the first part here - introduction

Demo

Github repo: fenbf/GLSamples

How it works:

  • app shows number of rotating 2D triangles (wow!)
  • triangles are updated on CPU and then send (streamed) to GPU
  • drawing is based on glDrawArrays command
  • in benchmark mode I run this app for N seconds (usually 5s) and then count how many frames did I get
  • additionally I measure counter that is incremented each time we need to wait for buffer
  • vsync is disabled

Features:

  • configurable number of triangles
  • configurable number of buffers: single/double/triple
  • optional syncing
  • optional debug flag
  • benchmark mode (quit app after N seconds)

Code bits

Init buffer:

size_t bufferSize{ gParamTriangleCount * 3 * sizeof(SVertex2D)};
if (gParamBufferCount > 1)
{
bufferSize *= gParamBufferCount;
gSyncRanges[0].begin = 0;
gSyncRanges[1].begin = gParamTriangleCount * 3;
gSyncRanges[2].begin = gParamTriangleCount * 3 * 2;
}

flags = GL_MAP_WRITE_BIT | GL_MAP_PERSISTENT_BIT | GL_MAP_COHERENT_BIT;
glBufferStorage(GL_ARRAY_BUFFER, bufferSize, 0, flags);
gVertexBufferData = (SVertex2D*)glMapBufferRange(GL_ARRAY_BUFFER,
0, bufferSize, flags);

Display:

void Display() {
glClear(GL_COLOR_BUFFER_BIT);
gAngle += 0.001f;

if (gParamSyncBuffers)
{
if (gParamBufferCount > 1)
WaitBuffer(gSyncRanges[gRangeIndex].sync);
else
WaitBuffer(gSyncObject);
}

size_t startID = 0;

if (gParamBufferCount > 1)
startID = gSyncRanges[gRangeIndex].begin;

for (size_t i(0); i != gParamTriangleCount * 3; ++i)
{
gVertexBufferData[i + startID].x = genX(gReferenceTrianglePosition[i].x);
gVertexBufferData[i + startID].y = genY(gReferenceTrianglePosition[i].y);
}

glDrawArrays(GL_TRIANGLES, startID, gParamTriangleCount * 3);

if (gParamSyncBuffers)
{
if (gParamBufferCount > 1)
LockBuffer(gSyncRanges[gRangeIndex].sync);
else
LockBuffer(gSyncObject);
}

gRangeIndex = (gRangeIndex + 1) % gParamBufferCount;

glutSwapBuffers();
gFrameCount++;

if (gParamMaxAllowedTime > 0 &&
glutGet(GLUT_ELAPSED_TIME) > gParamMaxAllowedTime)
Quit();
}

WaitBuffer:

void WaitBuffer(GLsync& syncObj)
{
if (syncObj)
{
while (1)
{
GLenum waitReturn = glClientWaitSync(syncObj,
GL_SYNC_FLUSH_COMMANDS_BIT, 1);
if (waitReturn == GL_ALREADY_SIGNALED ||
waitReturn == GL_CONDITION_SATISFIED)
return;

gWaitCount++; // the counter
}
}
}

Test Cases

I've created a simple batch script that:

  • runs test for 10, 100, 1000, 2000 and 5000 triangles
  • each test (takes 5 seconds):
    • persistent_mapped_buffer single_buffer sync
    • persistent_mapped_buffer single_buffer no_sync
    • persistent_mapped_buffer double_buffer sync
    • persistent_mapped_buffer double_buffer no_sync
    • persistent_mapped_buffer triple_buffer sync
    • persistent_mapped_buffer triple_buffer no_sync
    • standard_mapped_buffer glBuffer*Data orphan
    • standard_mapped_buffer glBuffer*Data no_orphan
    • standard_mapped_buffer glMapBuffer orphan
    • standard_mapped_buffer glMapBuffer no_orphan
  • in total 5*10*5 sec = 250 sec
  • no_sync means that there is no locking or waiting for the buffer range. That can potentially generate a race condition and even an application crash - use it on your own risk! (at least in my case nothing happened - maybe a little bit of dancing vertices :) )
  • 2k triangles uses: 2000*3*2*4 bytes = 48 kbytes per frame. This is quite small number. In the followup for this experiment I'll try to increase that and stress CPU to GPU bandwidth a bit more.

Orphaning:

  • for glMapBufferRange I add GL_MAP_INVALIDATE_BUFFER_BIT flag
  • for glBuffer*Data I call glBufferData(NULL) and then normal call to glBufferSubData.

Results

All results can be found on github: GLSamples/project/results

100 Triangles

GeForce 460 GTX (Fermi), Sandy Bridge Core i5 2400, 3.1 GHZ

GeForce 460 GTX, buffer streaming

Wait counter:

  • Single buffering: 37887
  • Double buffering: 79658
  • Triple buffering: 0

AMD HD5500, Sandy Bridge Core i5 2400, 3.1 GHZ

AMD HD5500, buffer streaming

Wait counter:

  • Single buffering: 1594647
  • Double buffering: 35670
  • Triple buffering: 0

Nvidia GTX 770 (Kepler), Sandy Bridge i5 2500k @4ghz

Nvidia GTX 770, buffer streaming

Wait counter:

  • Single buffering: 21863
  • Double buffering: 28241
  • Triple buffering: 0

Nvidia GTX 850M (Maxwell), Ivy Bridge i7-4710HQ

Nvidia GTX 850M, buffer streaming

Wait counter:

  • Single buffering: 0
  • Double buffering: 0
  • Triple buffering: 0

All GPUs

With Intel HD4400 and NV 720M

All gpus, 100 tris, buffer streaming

2000 Triangles

GeForce 460 GTX (Fermi), Sandy Bridge Core i5 2400, 3.1 GHZ

GeForce 460 GTX, buffer streaming

Wait counter:

  • Single buffering: 2411
  • Double buffering: 4
  • Triple buffering: 0

AMD HD5500, Sandy Bridge Core i5 2400, 3.1 GHZ

AMD HD5500, buffer streaming

Wait counter:

  • Single buffering: 79462
  • Double buffering: 0
  • Triple buffering: 0

Nvidia GTX 770 (Kepler), Sandy Bridge i5 2500k @4ghz

Nvidia GTX 770, buffer streaming

Wait counter:

  • Single buffering: 10405
  • Double buffering: 404
  • Triple buffering: 0

Nvidia GTX 850M (Maxwell), Ivy Bridge i7-4710HQ

Nvidia GTX 850M, buffer streaming

Wait counter:

  • Single buffering: 8256
  • Double buffering: 91
  • Triple buffering: 0

All GPUs

With Intel HD4400 and NV 720M

All gpus, 2000 tris, buffer streaming

Summary

  • Persistent Mapped Buffers (PBM) with triple buffering and no synchronization seems to be the fastest approach in most tested scenarios.
    • Only Maxwell (850M) GPU has issues with that: slow for 100 tris, and for 2k tris it's better to use double buffering.
  • PBM width double buffering seems to be only a bit slower than triple buffering, but sometimes 'wait counter' was not zero. That means we needed to wait for the buffer. Triple buffering has no such problem, so no synchronization is needed.
    • Using double buffering without syncing might work, but we might expect artifacts. (Need to verify more on that).
  • Single buffering (PBM) with syncing is quite slow on NVidia GPUs.
  • using glMapBuffer without orphaning is the slowest approach
  • interesting that glBuffer*Data with orphaning seems to be even comparable to PBM. So old code that uses this approach might be still quite fast!

TODO: use Google Charts for better visualization of the results

Please Help

If you like to help, you can run benchmark on your own and send me (bartlomiej DOT filipek AT gmail ) the results.

Windows only. Sorry :)

Behchmark_pack 7zip @github

Go to benchmark_pack and execute batch run_from_10_to_5000.bat.

run_from_10_to_5000.bat > my_gpu_name.txt

The test runs all the tests and takes around 250 seconds.

If you are not sure your GPU will handle ARB_buffer_storage extension you can simply run persistent_mapped_buffers.exe alone and it will show you potential problems.

Non Static Data Members Initialization

$
0
0

My short summary for non static data members initialization from modern C++. A very useful feature. Should we use it or not?

Intro

Non-static data member initializersPaper N2756
Visual StudioSince VS 2013
GCCSince GCC 4.7
Intel CompilerSince version 14.0
ClangSince Clang 3.0

Previously you could only initialize static, integral and const members of a class. Now it is extended to support non static members that do not need to be const and may have any type.

Basic example

class SimpleType
{
private:
int a { 1 }; // << wow!
int b { 1 }; // << wow2!
string name { "string" }; // wow3!

public:
SimpleType() {
cout << "SimpleType::ctor, {"
<< a << ", "
<< b << ", \""
<< name << "\"}"
<< endl;
}
~SimpleType() {
cout << "SimpleType::destructor"<< endl;
}
};

If we create an object of type SimpleType:

SimpleType obj;

On the output we will get:

SimpleType::ctor, {1, 1, "string"}

All of member variables were properly initialized before our constructor was called. Note, that we did not initialize members in the constructor. Such approach is not only available for simple types like int, but also for a complicated type like std::string.

Why useful

  • Easier to write
  • You are sure that each member is properly initialized.
    • you cannot forget to initialize a member like when having a complicated constructor. Initialization and declaration are in one place - not separated.
  • Especially useful when we have several constructors.
    • Previously we would have to duplicate initialization code for members or write custom method like InitMembers() that would be called in constructors.
    • Now, you can do a default initialization and constructors will only do its specific jobs…

More details

Let’s now make some more advanced example:

SimpleType with a new constructor:

class SimpleType
{
private:
int a { 1 }; // << wow!
int b { 1 }; // << wow2!
string name { "string" }; // wow3!

public:
SimpleType() { /* old code... */ }
SimpleType(int aa, int bb)
: a(aa), b(bb) // << custom init!
{
std::cout << "SimpleType::ctor(aa, bb), {"
<< a << ", "
<< b << ", \""
<< name << "\"}"
<< std::endl;
}
~SimpleType() {
cout << "SimpleType::destructor"<< endl;
}
};

And AdvancedType:

class AdvancedType
{
private:
SimpleType simple;

public:
AdvancedType() {
cout << "AdvancedType::ctor"<< endl;
}
AdvancedType(int a) : simple(a, a) {
cout << "AdvancedType::ctor(a)"<< endl;
}
~AdvancedType() {
cout << "AdvancedType::destructor"<< endl;
}
};

So now, AdvancedType uses SimpleType as a member. And we have two constructors here.

If we write:

AdvancedType adv;

We will get:

SimpleType::ctor, {1, 1, "string"}
AdvancedType::ctor

SimpleType::ctor (default) was called before AdvancedType::ctor. Note that AdvancedType::ctor does nothing beside printing…

Then, if we write:

AdvancedType advObj2(10);

We will get:

SimpleType::ctor(aa, bb), {10, 10, "string"}
AdvancedType::ctor(a)

So this time, the second constructor of SimpleType was called.

Note: even if you have a default initialization for a member, you can easily overwrite it in a constructor. Only one initialization is performed.

Any negative sides?

The feature that we discuss, although looks nice and easy, has some drawbacks as well.
  • Performance: when you have performance critical data structures (for example a Vector3D class) you may want to have "empty" initialization code. You risk having uninitialized data members, but you will save several instructions.
  • Making class non-aggregate: I was not aware of this issue, but Shafik Yaghmour noted that in the comments below the article.
    • In C++11 spec did not allowed aggregate types to have such initialization, but in C++14 this requirement was removed.
    • Link to the StackOverflow question with details

Should you use it?

I do not think there are any serious drawbacks of using non static data members initialization. You should be aware of the negative sides (mentioned in the section above), but for something like 90% of cases it should be safe to use.

If your coding guideline contains a rule about initialization of every local variable in the code, then, in my opinion, non static data member initialization completes this approach.

BTW: If that puts any standard, this concept is not forbidden in Google C++ guide

Your turn

You can play with my basic code here: nonstatic_members_init.cpp

What do you think about Non static data member initialization?
Do you use it in your code?

Do you use non static data member initialization?
yes - at work & in private projects
yes - but only in private projects
no - this feature is evil!
Poll Maker

Comments

Thanks for all the comments on this site and also:!

Finding memory leaks with Deleaker

$
0
0

Since the beginning of January I got a chance to play with a nice tool that’s called Deleaker. Its main role, as can be easily decoded, is to find leaks in your native applications. I often had problems with creating and maintaing custom code that tracks leaks, so Deleaker seems to be a huge relief in that situations.

Let’s see how it works and how can it help with native app development.

Promotional note This review is sponsored. Still, opinions expressed here are my own.

Intro

Basic product information:

featuredescription
supported Visual Studio2005, 2008, 2010, 2012, 2013. VS2015 shouldn’t be a problem as well.
TypeCan be used as an extension in Visual Studio or as a standalone application.
Native/ManagedTracks leaks only in Native (C/C++) apps
Leak typesMemory (new/delete, malloc…), GDI objects, User32 objects, Handles, File views, Fibres, Critical Sections, and even more.
OtherGathers full call stack, ability to take snapshots, compare them, view source files related to an allocation.

Below there is a screenshot from the official site:
Screenshot from official site deleaker.com

It’s quite simple: you have a list of resource allocations, with source file, module, leak type, etc. You can click on selected allocation and then you will see its call stack. Eventually you can double click on a call stack entry and go to a particular line of code that is responsible for the allocation.

How it works?

Basically, Deleaker hooks into every possible resource allocation function - like HeapAlloc, CreateFile, CreatePen, etc. and into its counterparts like HeapFree, CloseHandle, DeleteObject, etc.

Every time your app performs an allocation stack trace is being saved. While application is running you can get a list of all allocations. When the app is closed Deleaker reports leaks that were not released to the system.

Simple example: when you write

int *tab = new int[10];

Deleaker will store information about this particular memory allocation. When, at some point in the code, you use delete [] tab; then Deleaker will record this as a proper memory deallocation - no leak will be reported.

Let’s now test some code with Deleaker and then you will be able to see the tool in action.

Basic Test

I’ve opened solution github/fenbf/GLSamples from my previous OpenGL sample. Then, I enabled Deleaker and simply run it in Debug Mode.

While the app was running I pressed “Take snapshot” (on the Deleaker toolbar) and I got the following list of allocations:

List of allocations while app is running, Deleaker

As we can see there is a whole range of small allocations (made by std and crt library) and two large allocations made explicitly by the app.

The first buffer (stored in std::unique_ptr) is used to hold original positions for triangles.

The second buffer (allocated using new []) stores temporary data that is computed every frame and then send to GPU.

You can click on the particular allocation and see its stack trace.

Then, I closed the application using “X” button. At the end another ‘snapshot’ is automatically saved that shows leaks.

detected memory leaks, Deleaker

On the list showed above, there is one interesting allocation that was not released. I simply forgot to use delete [] gVertexBufferData!! The first buffer (for triangles) was properly deleted, because I used smart pointer there. But the second buffer needs to be deleted explicitly.

After looking at this problem more closely I figured out that that buffer is destroyed when I press ESC key (in Quit function), but not when I use “X” window button (Quit function is not called in that case).

So I could fix that by adding:

glutSetOption(GLUT_ACTION_ON_WINDOW_CLOSE, 
GLUT_ACTION_GLUTMAINLOOP_RETURNS);

And ensuring that my cleanup function will be called at any condition.

More Leak Types

Of course, memory allocations are not the main things that can leak. Deleaker can track various system handles as well. Here is a dump from a popular app found at codeproject:

Snapshot while the app is running:

tracking GDI objects, Deleaker

Here we can see HPEN and HBRUSH objects that were used by the application.

Deleaker looks for functions like CreatePen or CreateSolidBrush.

Summary

After using Deleaker, I think, I can highly recommend this tool. In a few seconds you can get detailed reports from any kind of your native apps. All you have to do is to analyse it and fix issues.

It’s great to have a separate tool rather than custom code that might or not work. Of course, It’s possible to write such solution on your own. Still, I haven’t seen many projects that do such tracking well. Additionally, if you change a project you have to spent additional time to ‘copy’ (and adapt) that leak-test code from other projects.

Other good solutions like VLD are very helpful (and free), but it can only track memory allocations.
Deleaker hooks into almost every possible resource allocation function so it can track a lot more issues.

Pros:

  • User Interface that is very easy to learn.
    • Works as Visual Studio extension window and as a standalone app.
  • Finds lots of leak types (not only new/delete…)
    • Useful for legacy application, MFC, win32, etc…
  • Ability to take snapshots and compare allocations
  • Full or compressed stack view,
  • Easy to move to a problematic line of code
  • Fast response from the support!

Cons:

  • Sometimes you need to filter out leaks that comes not directly from your app: like CRT, std or even MFC.
    • It would be nice to have a public list of leaks that were reported and looks strange. That way if you are not sure about your leak you could see if that was already reported.

Flexible particle system - Renderer optimization

$
0
0

Finally, I managed to finish the adventure with my particle system! This time I’d like to share some thoughts about improvements in the OpenGL renderer.

Code was simplified and I got little performance improvement.

The Series

Plan For This Post

Where we are?

As I described in the post about my current renderer, I use quite a simple approach: copy position and color data into the VBO buffer and then render particles.

Here is the core code of the update proc:

glBindBuffer(GL_ARRAY_BUFFER, m_bufPos);
ptr = m_system->getPos(...);
glBufferSubData(GL_ARRAY_BUFFER, 0, size, ptr);

glBindBuffer(GL_ARRAY_BUFFER, m_bufCol);
ptr = m_system->getCol(...)
glBufferSubData(GL_ARRAY_BUFFER, 0, size, ptr);

The main problem with this approach is that we need to transfer data from system memory into GPU. GPU needs to read that data, whether is is explicitly copied into GPU memory or read directly through GART, and then it can use it in a draw call.

It would be much better to be just on the GPU side, but this is too complicated at this point. Maybe in the next version of my particle system I’ll implement it completely on GPU.

Still, we have some options to increase performance when doing CPU to GPU data transfer.

Basic Checklist

  • Disable VSync! - OK
    • Quite easy to forget, but without this we could not measure real performance!
    • Small addition: do not use blocking code like timer queries too much. When done badly it can really spoil the performance! GPU will simply wait till you read a timer query!
  • Single draw call for all particles - OK
    • doing one draw call per a single particle would obviously kill the performance!
  • Using Point Sprites - OK
    • An interesting test was done at geeks3D that showed that points sprites are faster than geometry shader approach. Even 30% faster on AMD cards, between 5% to 33% faster on NVidia GPUs.
    • Of course point sprites are less flexible (do not support rotations), but usually we can live without that.
  • Reduce size of the data - Partially
    • I send only pos and col, but I am using full FLOAT precision and 4 components per vector.
    • Risk: we could reduce vertex size, but that would require doing conversions. Is it worth it?

The numbers

Memory transfer:

  • In total I use 8 floats per vertex/particle. If a particle system contains 100k particles (not that much!) we transfer 100k * 8 * 4b = 3200k = ~ 3MB of data each frame.
  • If we want to use more particles, like 500k, it’ll be around 15MB each frame.

Computation:
In my last CPU performance tests I got the following numbers: one frame of simulations for each effect (in milliseconds).

particle counttunnelattractorsfountain
500k5.026.545.15

Now we need to add the GPU time + memory transfer cost.

Our Options

As I described in details in the posts about Persistent Mapped Buffers (PMB )I think it’s obvious we should use this approach.

Other options like: buffer orphaning, mapping, etc… might work, but the code will be more complicated I think.

We can simply use PMB with 3x of the buffer size (triple buffering) and probably the performance gain should be the best.

Here is the updated code:

The creation:

const GLbitfield creationFlags = GL_MAP_WRITE_BIT |
GL_MAP_PERSISTENT_BIT |
GL_MAP_COHERENT_BIT |
GL_DYNAMIC_STORAGE_BIT;
const GLbitfield mapFlags = GL_MAP_WRITE_BIT |
GL_MAP_PERSISTENT_BIT |
GL_MAP_COHERENT_BIT;
const unsigned int BUFFERING_COUNT = 3;
const GLsizeiptr neededSize = sizeof(float) * 4 *
count * BUFFERING_COUNT;

glBufferStorage(GL_ARRAY_BUFFER, neededSize,
nullptr, creationFlags);

mappedBufferPtr = glMapBufferRange(GL_ARRAY_BUFFER, 0,
neededSize, mapFlags);

The update:

float *posPtr = m_system->getPos(...)
float *colPtr = m_system->getCol(...)
const size_t maxCount = m_system->numAllParticles();

// just a memcpy
mem = m_mappedPosBuf + m_id*maxCount * 4;
memcpy(mem, posPtr, count*sizeof(float) * 4);
mem = m_mappedColBuf + m_id*maxCount * 4;
memcpy(mem, colPtr, count*sizeof(float) * 4);

// m_id - id of current buffer (0, 1, 2)

My approach is quite simple and could be improved. Since I have a pointer to the memory I could pass it to the particle system. That way I would not have to memcpy it every time.

Another thing: I do not use explicit synchronization. This might cause some issues, but I haven’t observed that. Triple buffering should protect us from race conditions. Still, in real production code I would not be so optimistic :)

Results

Initially (AMD HD 5500):

GPUTunnelAttractorsFountain
500k77.579.999.6
1mln36.329.443.2

After:

GPUTunnelAttractorsFountain
500k81.5 (~5.2%)82.2 (~2.9%)107.2 (~7.6%)
1mln39.9 (~9.9%)31.8 (~8.2%)47.2 (~9.3%)

Reducing vertex size optimization

I tried to reduce vertex size. I’ve even asked a question on StackOverflow:

How much perf can I get using half_floats for vertex attribs?

We could use GL_HALF_FLOAT or use vec3 instead of vec4 for position. And we could also use RGBA8 for color.

Still, after some basic tests, I did not get much performance improvement. Maybe because I lost a lot of time for doing conversions.

What’s Next

The system with its renderer aren’t that bad. On my system I can get decent 70..80FPS for 0.5mln of particles! For 1 million particle system it drops down to 30… 45FPS. which is also not that bad!

But definitely, the plan is to move to the GPU side.

Resources

Vulkan

$
0
0

At GDC 2015 in San Francisco, Khronos announced new API for graphics and compute, previously it was called glNext… but now the official name is “Vulkan”!

I could not resist to write some comments about this new and intriguing standard that can potentially “replace” OpenGL.

The basics

A picture is worth a thousand words:

(from the official Khronos presentation):

Vulkan API info

  • Unified API for mobile, desktop, console and embedded devices.
  • Shaders in SPIR-V format (itermediate language format)
  • Simplified driver with layered approach
  • Multithreaded, app is responsible for synchronization
  • Should be easier to build tools
    • Valve, LunarG, Codeplay and others are
      already driving the development of open
      source Vulkan tools
  • Initial specs and implementations expected this year
  • Will work on any platform that supports OpenGL ES 3.1 and up
  • Initial demos shows something like 410ms per frame for GL version and 90ms for Vulkan

My view

It’s great news! Of course, it’s a pity that we do not have beta drivers for that. We can base our opinions only on theoretic assumptions and some internal technical demos.

But since tech demos are available, it means that beta drivers are not that far from being published. Everyone mentions that we should see VulkanSDK this year.

Look here for ImgTec Demo screen:

Vulkan demo from Imagination Technologies

Or here for DOTA 2 preview (running on Source 2 Engine!): youtube

Vulkan will hopefully beat DirectX 12, Mantle and Metal. This will not happen immediately - Apple will not be happy to remove Metal support and give Vulkan instead. But all of the big players are active members of the Khronos community. So sooner or later, we should see Vulkan implementations on most of platforms.

There is also a question if Vulkan will be faster than Metal (on iOS) and Mantle? Since it is multiplatform some of the performance can be lost. Metal or Mantle can be closer to the hardware/system.

Below you can find a intro to GLAVE - Debug tool for the Vulkan API.

Layered architecture will enable developers to have a fast path for a final ready product and also include debug/validation layers when doing the development.

SPIR-V as an intermediate language (also for OpenCL 2.1) will greatly reduce steps needed to prepare a shader. Take a look at this very complicated scenario in Unity (described @G-Truc) that handles cross compilation between GLSL and HLSL. With SPIR-V you will compile your shaders into this intermediate format and then ship it with the app binaries. Driver will take that IL code (stream of 32 bit words actually) and finish the compilation process. It will be much faster than when compiling directly from GLSL. Khronos is working on offline tools that will compile from various shader languages into IL format.

And one more thing:

Instead of

glBindBuffer...
glMapBuffer...
glTexture...

we’ll be using:

vkCreateCommandBuffer
vkMapMemory
vkCmdPipelineBarrier
vkCmdBindVertexBuffer

From just that sample command list it looks like we’ll be definitely closer to metal! :)

What do you think about Vulkan?

Soft Skills - Book Review

$
0
0

Programmers are not machines that just write code. We have feeling and emotions as well! ;)

We all need to learn a lot of new things, sharpen the saw, focus, make good choices about our career path, and simply, have fun.

While most of books describe technical side of coding, not many address the psychological/business/economic side of our profession. In this niche one great book appeared, it’s called “Soft Skills”. The book is written by John Sonmez from simpleprogrammer.com

Is this book worth reading?

The structure

There are 71 chapters grouped into 7 parts:

  1. Career
  2. Marketing Yourself
  3. Learning
  4. Productivity
  5. Financial
  6. Fitness
  7. Spirit

Plus three nice bonus Appendices at the end.

You might be suprised by the number of chapters. But actually, little chapters make the book very easy to read. You do not need lot of time for that. Have 5 minutes? Just open one chapter and you can easily absorb it. The order is also not that important. This reminds me similar approach from "The Passionate Programmer". Very practical.

What I like

I was amazed by the author’s approach that is shown across the book. He presents realistic ideas instead of those nice and cheap talks from many books about motivation… Sonmez writes that if you want to succeed you need to work hard, there are not so many short paths.

We all spend some time doing nothing, browsing net instead of doing actual work, make mistakes about our career… or we are too optimistic about starting our own company/startup and quickly realise it was a mistake. In the book I could find several good ideas how to fight all of those problems. You might all heard it somewhere else, but here you have this unique, practical approach added.

Some example chapters that I especially like:

  • Quit your job: maybe it’s not good idea to just go to your boss and resign. Maybe it’s better to do it gradually? Create side project and spend several hours each day…
  • Chapters about learning process.
  • How to efficiently use Pomodoro technique.
  • Chapters about marketing yourself. I think not many people pay real attention to this. Having a blog is very good idea in fact. So at least, I think, I am doing the right thing at the moment :)
  • How to motivate when you work from home
  • Personal story of the author. His success was not that obvious and easy, he worked really hard to achieve the current comfortable state.

What I don't like

Hard to tell exactly :)

This is not a technical book, so I cannot write that ABC chapter is completely wrong or in XYZ there is no logic… The book describes ‘soft’ ideas that might work for you or not. You can also disagree with some part of the content. I have several chapters that I skipped, was not interested or simply do not like, but it might be completely different for you.

Summary

My final mark: 4.5/5

This is a great and easy to read book. Implementing all ideas might not be that simple, but the book has a lot of positive energy that can really help and motivate. What’s unique about this book is that instead of showing only nice and idealistic motives, it presents realistic, practical and sometimes even painful side of (programmer) work.

You can put this book along such great books like, "The Passionate Programmer", "The Pragmatic Programmer", "Pragmatic Thinking and Learning"

Pros:

  • Great chapter about quitting your job!
  • Honest descriptions
  • Realistic approach towards life
  • Compact, easy to read and understand chapters
  • Described skills are proven and used extensively by the author
  • Ideas can be applied not only to programming proffesion.
  • I like appendices!

Cons:

  • Depending on your previous knowledge, some chapters might sound too easy, too basic or shallow. Or you can simply disagree.

And BTW: look at Soft Skills's Amazon Site, currently, more than 99% of reviews (above 120 reviews) give five stars!. All of those reviews cannot be wrong ;)

Your turn:

Have you read this book?

What is your opinion about it?


Flexible Particle System - Summary

$
0
0

It’s been one year since the first posts about my particle system: a demo in March and then an introduction in April. Last time I wrote about renderer updates and this was the last planned post for the series. I think most of requirements were achieved and I can be quite happy about the results. Now, it’s time to close the project - or at least - close this version, use the experience and move on!

What have I learnt over that time?

The Series

Plan For This Post

The most recent repo: particles/renderer_opt @github

Is this system useful?

The first question I should ask is if this particle library is actually useful? Is it doing its job?

The answer: I think so! :)

I am aware that my code is not yet production ready, but still, it has quite a good base. It would be possible to extend it, write some kind of an editor on top, or use in a real game (a small game, not AAA! :)

From time to time I try to play with the system and create some new effects. Recently, I’ve experimented with adding trials:

Trials required work in the internal logic and some updates in the renderer. However, the classes built on top of the core system (updaters and generators) were untouched. Maybe in some time I’ll be able to write more about it…

For a new effect you just have to combine existing pieces (or write new small parts).

Want some rain?

  • use BoxPosGen, BasicColorGen, BasicVelGen, BasicTimeGen generators
  • add EulerUpdater (set good gravity factor), time & color updaters
  • optionally write custom updated that kills particle when it reaches the ground.

Want some stars?

  • use SphereVelGen, BasicColorGen, BasicTimeGen
  • Euler or Attractor Updaters

This is the flexibility I was aiming for. Currently the number of generators and updaters is limited, but its relatively easy to add more. Then, creating more complicated effects could be even simpler.

Todo: maybe add some triggers system? like when doing explosions?

The renderer is still quite a simple thing. It hasn’t changed much over the time. I figured out that there is not much sense investing time into that when it was obvious the whole system needs to be rewritten to GPU code. On the other hand, if you want to stay just on the CPU side, then updating the current state of the renderer might be quite easy. Probably more texture management stuff needs to be done. Right now you just set a texture and all the particles are drawn using it.

But as a summary: the system mostly do it’s intended job and it's not that complicated to use and update.

Experience

The other “requirement” for the system was that I would learn something. And this time it was also achieved.

Tech

  • How to effectively move data computed on CPU into GPU: I even made quite a long post about moving data and the benchmark for it.
    • One nice technique from OpenGL 4.4: Persistent Mapped Buffers (from ARB_buffer_storage). It was eventually used in the renderer.
  • SSE instructions:
    • In the post about code optimizations I, unfortunately, failed to create faster code than my compiler could produce + code used in glm::simdVec4:) That’s OK, we can simply rely on the tools and third party libraries.
  • How to do better benchmarking
    • ”Theory” was described in How to start with Software Optimization
    • You can just run your app and use a stopwatch. But if you have different options, configurations, etc… soon you will need a lot of time to measure everything. Good automation is the key in this process. I’ve created batch scripts, internal code logic that enables me to just start the app and then wait. At the end I’ll have a txt or even nice csv file.
  • Optimization techniques
    • I’ve read a lot of good stuff in The Software Optimization Cookbook and Video Game Optimization books.
    • Still, some of best practices are hard to implement in a real scenario. Or even if you do, you got little improvement.

“Organizational”
Actually it was not easy to publish all those posts. I did not expect to finish everything in two or three months, but still - one year… quite too much! On the other hand, this is my side project, so you cannot make a good estimate in that scenario.

  • Writing code is easy, but writing good description, with teaching purpose… is not.
  • Persistence: without having a clear goal - “write the full series” - I would have probably given up at some point. Just stick to your original plan and it should be fine.
  • Managing git: creating branches for each optimization track or bigger feature… next time I’ll probably know how to do it better :)

What’s Next

Maybe next project!? Particles are nice, but working on that for too long can be boring :) I have lots of different ideas and maybe next time you will read about them. Then, after some time, I’ll probably return to my particle system and rewrite it (again) :)

Here is a video showing the running system

PDB Was Not Found - Linker Warning

$
0
0

You’ve just recompiled a 3rd party library in Visual Studio, copied the .lib file into a proper directory, added dependencies into your final project… recompiled and it worked nicely! Good. So now you can commit the changes into the main repository.

Then, unfortunately, you got a report from a build server (or from your colleague) that your recent change generated 10s of warning messages about some missing files from this new library… why is that? It worked well on your local machine! :)

Possible reason: missing PDB information.

Intro

What is a PDB file?

In short, a PDB file stores all the important imformation about the source code that might be used by the debugger. For C++ it contains the following things:

  • Public, private, and static function addresses
  • Global variable names and addresses
  • Parameter and local variable names
  • Type data consisting of class, structure, and data definitions
  • Frame Pointer Omission (FPO) data, which is the key to native stack walking on x86
  • Source file names and their lines

We have also two ways of building a program database: generate a single database for the whole project, or store debug information inside each compilation unit. By default Visual Studio uses the first approach (new format version) and the second is called “C7 Compatible Format” (old format).

Missing PDB warnings are not that serious, but it’s very frustrating to have them when building projects. A warning will be generated for each referenced compilation unit from that problematic library.

For instance you can get the following warning:

freeglut_staticd.lib(freeglut_callbacks.obj) : warning LNK4099: PDB 'vc120.pdb' was not found with 'freeglut_staticd.lib(freeglut_callbacks.obj)' or at '...\vc120.pdb'; linking object as if no debug info
freeglut_staticd.lib(freeglut_cursor.obj) : warning LNK4099: PDB 'vc120.pdb' was not found with 'freeglut_staticd.lib(freeglut_cursor.obj)' or at '...\vc120.pdb'; linking object as if no debug info

Not nice, we want to have build output as clean as possible.

In the example above, I've recompiled Freeglut.lib. I copied lib files into my target folder and referenced it from my main project. When I tried to compile the project I got those warnings.

The Solution

First option:

Every time you distribute your library just copy PDB file. By default the file name is “vcABC.pdb” (platform toolset name). This can generate some collisions with different libraries, so you can just change it in:

Project Property Pages -> C++ -> Output Files -> Program Database File Name

So every time you build your library, copy .lib file and .pdb into your destination folder.

Hint: on your local machine Visual Studio will remember where your pdb files are located. So even if you copy just lib files it will not report any warnings. You can delete all build files from this library (clean) and now you should see the warnings.

Second option:

Use a compiler option that will embed debug information inside linked library. That way you just have to copy .lib files and skip .pdb files.

How to set this compiler option?

Go to:

Project Property Pages -> C++ -> General -> Debug Information Format

You have the following options:

  • (None) Just leave the field empty: no program debug information will be generated.
  • /Z7 - this will produce .obj files with debug info stored inside them.
  • /Zi - generates program database in a separate file.
  • /ZI - same as /Zi, but it is used for “Edit & Continue” option.

Debug Information Format Settings

Full detail @MSDN page: /Z7, /Zi, /ZI (Debug Information Format)

Note that Z7 generates old format for debug information. And since this info is stored inside each compilation unit, the total size might be bigger than unified and single pdb file.

From my experience, I usually set /Z7 for small third party libraries that I need to rebuild and attach to my main project. I did not have any problems so far with /Z7 option. And I can just remember about copying one .lib file and do not care about additional things.

What is your experience with debug information for cpp libraries? How did you solve problems with missing pdb files?

Applying the Strategy Pattern

$
0
0

Let’s look at the following problem:

We are designing a drawing application. We want some objects to be automatically scaled to fit inside parent objects. For example: when you make a page wider, images can decide to scale up (because there’s more space). Or if you make a parent box narrower image needs to scale down.

What are the design and implementation choices that we can make? And, how the Strategy pattern can help?

Basic Solution

We can easily came up with the following class design:

class IRenderableNode
{
virtual void Transform() = 0;
virtual void ScaleToFit() = 0; // <<
};

class Picture : public IRenderableNode
{
void Transform();
void ScaleToFit();
};

The ScaleToFit method, should do the job. We can write implementations for various objects that need to have the indented behaviour. But, is this the best design?

The main question we should ask: is scaling to fit a real responsibility of IRenderableNode? Maybe it should be implemented somewhere else?

Let’s ask some basic questions before moving on:

  • is feature X a real responsibility of the object?
  • is feature X orthogonal to class X?
  • are there potential extensions to feature X?

For our example:

  • Scaling to Fit seems to be not the core responsibility of the Picture/Renderable object. The Transform() method looks like main functionality. ScaleToFit might be probably built on top of that.
  • Scaling To Fit might be implemented in different ways. For example we might always get bounding size from the parent object, but it can also skip parents and get bounding box from the page or some dynamic/surrounding objects. We could also have a simple version for doing a live preview and more accurate one for the final computation. Those algorithm versions seems to be not related to the particular node implementation.
  • Additionally, Scaling to fit is not just a few lines of code. So there is a chance that with better design from the start it can pay off in the future.

The Strategy pattern

A quick recall what this pattern does…

From wiki

The strategy pattern

  • defines a family of algorithms,
  • encapsulates each algorithm, and
  • makes the algorithms interchangeable within that family.

Translating that rule to our context: we want to separate scaling to fit methods from the renderable group hierarchy. This way we can add different implementations of the algorithm without touching node classes.

Improved Solution

To apply the strategy pattern we need to extract the scaling to fit algorithm:

class IScaleToFitMethod
{
public:
virtual void ScaleToFit(IRenderableNode *pNode) = 0;
};

class BasicScaleToFit : public ScaleToFitMethod
{
public:
virtual void ScaleToFit(IRenderableNode *pNode) {
cout << "calling ScaleToFit..."<< endl;

const int parentWidth = pNode->GetParentWidth();
const int nodeWidth = pNode->GetWidth();

// scale down?
if (nodeWidth > parentWidth) {
// this should scale down the object...
pNode->Transform();
}
}
};

The above code is more advanced than the simple virtual method ScaleToFit. The whole algorithm is separated from the IRenderableNode class hierarchy. This approach reduces coupling in the system so now we can work on algorithm and renderable nodes independently. Strategy also follows the open/closed principle: now, you can change the algorithm without changing the Node class implementation.

Renderable objects:

class IRenderableNode
{
public:
IRenderableNode(IScaleToFitMethod *pMethod) :
m_pScaleToFitMethod(pMethod) { assert(pMethod);}

virtual void Transform() = 0;
virtual int GetWidth() const = 0;

// 'simplified' method
virtual int GetParentWidth() const = 0;

void ScaleToFit() {
m_pScaleToFitMethod->ScaleToFit(this);
}

protected:
IScaleToFitMethod *m_pScaleToFitMethod;
};

The core change here is that instead of a virtual method ScaleToFit we have a “normal” non virtual one and it calls the stored pointer to the actual implementation of the algorithm.

And now the ‘usable’ object:

class Picture : public IRenderableNode
{
public:
using IRenderableNode::IRenderableNode;

void Transform() { }
int GetWidth() const { return 10; }
int GetParentWidth() const { return 8;
};

The concrete node objects don’t have to care about scaling to fit problem.

One note: look at the using IRenderableNode::IRenderableNode; - it's an inherited constructor from C++11. With that line we do not have to write those basic constructors for the `Picture` class, we can invoke bases class constructors.

The usage:

BasicScaleToFit scalingMethod;
Picture pic(&scalingMethod);
pic.ScaleToFit();

Play with the code on Coliru online compiler: link to the file

Here is a picture that tries to describe the above design:

Applying the strategy pattern

Notice that Renderable Nodes aggregate the algorithm implementation.

We could even go further and do not store a pointer to the implementation inside RenderbleObject. We could just create an algorithm implementation in some place (maybe transform manager) and just pass nodes there. Then the separation would be even more visible.

Problems

Although the code in the example is very simple it still shows some limitations. Algorithm takes a node and uses its public interface. But what if we need some private data? We might extend the interface or add friends?

There might be also a problem that we need some special behaviour for a specific node class. Then we might need to add more (maybe not related?) methods into the interface.

Other options

While designing you can also look at the visitor pattern.

Visitor is more advanced and complicated pattern but works nicely in a situations where we often traverse hierarchies of nodes and algorithm need to do different things for different kind of objects. In our case we might want to have specific code for Pictures and something else for a TextNode. Visitors also let’s you to add completely new algorithm (not just another implementation) without changing the Node classes code.

Below there is a picture with a general view of the visitor pattern.

]the visitor design pattern overview

Another idea might be to use std::function instead of a pointer to an algorithm interface. This would be even more loosely coupled. Then you could use any callable object that accepts interface param set. This would look more like Command pattern.

Although the strategy pattern allows in theory for dynamic/runtime changes of the algorithm we can skip this and use C++ templates. That way we’ll still have the loosely coupled solution, but the setup will happen in compile time.

Summary

I must admit I rarely considered using the strategy pattern. Usually I choose just a virtual method… but then, such decision might cost me more in a long run. So it's time to update my toolbox.

Things to remember:
The strategy pattern allows you to separate an algorithm from the family of objects.

In real life, quite often, you start with some basic implementation and then, after requirement change, bugs, you end up with a very complicated solution for the algorithm. In the latter case the strategy pattern can really help. The implementation might be still complicated, but at least it’s separated from objects. Maintaining and improving such architecture should be much easier.

Just to remember: you can play with the code on Coliru online compiler: link to the file

Your turn

  • What do you think about the proposed design?
  • Would you use that in production code?

Reference

OpenGL SuperBible 7th

$
0
0

OpenGL Superbible 7th

Several moths ago I’ve noticed there would be another version of OpenGL Superbible. This time the 7th edition! Without much thinking I quickly I pre-ordered it. Around two weeks ago the book appeared at my doorstep so now I can share my thoughts with you.

Is this book worth buying? Is the new content described in an valuable way? Let’s see…

Structure

The first core information: this books covers OpenGL 4.5 - newest version of the API

In the book we can find three parts:

  • Foundations
  • In Depth
  • In Practice

In the first part - Foundations - we can read about the whole graphic pipeline, how data is transformed and rasterized into a triangle. This is a really good introduction to the whole topic and gives high level overview of how triangles appear on the screen. There is also chapter about Math, Buffers and Shading Language.

Equipped with the knowledge from the first module we can now dig further into details of the graphics pipeline: here we can get more about vertex processing, all drawing commands (direct and even indirect versions), geometry shaders and tesselation, fragment processing (framebuffer, antyaliasing, etc) and there is also chapter on Comput Shaders (a separate compute pipeline avauilable on GPUs) and a chapter on monitoring the pipeline (GPU queries).

Then, the third part: In Practice. The authors covers such examples as:

  • Lighting models (Blinn-Phong, normal mapping, env mapping, …)
  • Non-Photo-Realistic Rendering
  • Deferred shading
  • Screen space effects
  • Fractal rendering
  • Distance fields for fonts and shapes

In this part we have also a great chapter about AZDO techniques (Approaching Zero Driver Overhead) and how to debug your OpenGL application.

Some content was removed, though. Now, there are no chapters about platform specific solutions. One reason is the length of the book itself (900 pages!). That new chapter would greatly enlarge the book.

BTW: the github repository with all the source code can be found here: openglsuperbible/sb7code

Some screenshots takes from code examples (more can be found on book’s site, here)

Dragons:

OpenGL SuperBible 7th Dragons

Terrain, Stars, Julia:

OpenGL SuperBible 7th

My View

I own two previous books: version 1 and version 4. Of course the first version is ancient and the 7th version cannot be compared to that one. But I was really happy to see that there are lots of changes against the 4th edition. So I know that my money wasn’t wrongly invested :)

The idea of separating technical details and practical examples looks really great to me. If I want to refresh knowledge about some specific topic I can easily find it and chapters will contain just the important parts. Another approach is to cover tech details inside some bigger example, and then you need to filter just the information you are looking for.

With OpenGL 4.5 we have several powerful improvements (against 4.3 that was covered in 6th edition of the book): immutable storage for buffers (textures had immutable storage already in the version 4.2), robustness, OpenGL ES compatibility, Direct State Access and some other extensions as well.

I was especially interested in Direct State Access (GL_ARB_direct_state_access). It greatly affects the style of your OpenGL code. Previously you had to bind your objects to specific targets and then perform operations on those objects. Now you can just operate directly on the objects - without binding.

For example:

glBindBuffer(GL_ARRAY_BUFFER, bufID);
int* ptr = (int*)glMapBufferRange(GL_ARRAY_BUFFER, 0, bufSize, flags);

now you can just call:

glMapNamedBufferRange(bufID, 0, bufSize, flags);

so we do not need to care about existing bounded objects (you need to add code to fetch current binding and restore them after your changes…), conflicts… and there is simply less OpenGL methods to call.

This new style is used across the book, so it’s easy to pick it and apply to own solutions.

Another chapter that got my huge attention was about important new extensions: bindless textures (ARB_bindless_texture) and sparse textures (ARB_sparse_texture). Those extensions are not yet Core, but they are common on newest GPUs (Nvidia- since Fermi, AMD since Radeon7000, not yet on Intel). It seems that they will be part of the next OpenGL (I hope!). They allow for really efficient texture data management (in the future for generic buffers as well) and are great part of AZDO techniques. I was positively surprised that such quite advanced content was nicely described in Super Bible book.

Summary

My final mark: 4.99/5

Pros

  • targets OpenGL 4.5 - so you are very up to date with modern techniques
    • especially the DSA API style has much impact on how you should write new code - forget about most of binding targets!
  • chapters on AZDO: bindless, persistent mapping, multithreading, indirect drawing commands.
  • lots of examples: divided into ‘tech only’ and ‘practical’
  • clear language, very well written
  • technical chapters and the whole part of ‘practical usage’

Cons

  • not much here could be found…
  • maybe… this book contains around 900 pages, but is in a paperback form. In my previous book most of color plates pages come off completely. Hard cover would be nice option here.
  • and maybe that chapter on platform spec could return, maybe with some info about WebGL/OpenGL ES… but I can imagine this would add at least 100 pages more to the book.

I wish there was another book “Advanced Super Bible” that is published along with the main book, with more examples and even more advanced topics (something like More OpenGL Game Programming). Unfortunately I am aware that this would be awful lots of work and partially such more detailed topics are covered in books like GPU Pro , OpenGL Cookbooks, etc… or OpenGL Insights.

Still, OpenGl Superbible 7th is a really solid book and even more experienced graphics programmers will find it very useful (not just for the reference, but for details about new extensions and AZDO techniques).

Your turn:

  • Have you read this book?
  • Will you buy it?
  • What is your opinion about it?

Visual Studio slow debugging and _NO_DEBUG_HEAP

$
0
0

Verify you assumptions about tools you use!

Some time ago I was tracing a perf problem (UI code + some custom logic). I needed to track what module was eating most of the time in one specific scenario. I prepared release version of the app and I added some profiling code. I’ve used Visual Studio 2013. The app used OutputDebugString so I needed to run the debugging (F5) in order to be able to see logs in the output window (I know I know, I could use DebugView as well…)
But, my main assumption was that when I run F5 in release mode, only a little performance hit would occur. What was my astonishment when I noticed it was a wrong idea! My release-debug session pointed to a completely different place in the code…

Note: this article relates to Visual Studio up to VS2013, in VS2015 debug head is fortunately disabled by default.

Story continuation

What was wrong with the assumption? As it appeared when I was starting the app with F5, even in release mode Visual Studio is attaching a special debug heap! The whole application runs slower, because every system memory allocation gets additional integrity checks.
My code used win32 UI and thus every list addition, control creation was double checked by this special heap. When running using F5 the main bottleneck seemed to be happening in that UI code. When I disabled the additional heap checking (or when I simply run my application without debugger attached) the real bottleneck appeared in a completely different place.

Those kind of bugs have even their name Heisenbug, those are bugs that disappear (or are altered) by tools that are used to track the problem. As in our situation: debugger was changing the performance of my application so I was not able to find a real hot spot…

Let’s learn from the situation! What is this debug heap? Is it really useful? Can we live without it?

Example

Let’s make a simple experiment:

for (int iter = 0; iter < NUM_ITERS; ++iter)
{
for (int aCnt = 0; aCnt < NUM_ALLOC; ++aCnt)
{
vector<int> testVec(NUM_ELEMENTS);
unique_ptr<int[]> pTestMem(new int[NUM_ELEMENTS]);
}
}

Full code located here: fenbf/dbgheap.cpp

The above example will allocate (and delete) memory NUM_ITERS x NUM_ALLOC times.

For NUM_ITERS=100 and NUM_ALLOC=100 and NUM_ELEMENTS=100000 (~400kb per allocation) I got

Release mode, F5: 4987 milliseconds
Release mode, running exe: 1313 milliseconds

So by running using F5, we get ~3.7 slower memory allocations!

Let’s compare calls stacks:

call stacks when running F5 and attaching debugger

To prepare the above images I run the app using F5 and I paused at random position. There were lots of allocations, so I usually entered some interesting code. Of course, producing the second view (without F5) was a bit harder, so I set a breakpoint using _asm int 3 (DebugBreak() also would work), then I got debugger attached so I could also pause at random. Additionally, since the second version runs much faster, I needed to increase number of allocations happening in the program.

Running with F5 I could easily break in some deep allocation method (and as you can see there is a call to ntdll.dll!_RtlDebugAllocateHeap@12 ()). When I attached debugger (the second call stack) I could only get into vector allocation method (STD).

Debug Heap

All dynamic memory allocation (new, malloc, std containers, etc, etc…) at some point must ask system to allocate the space. Debug Heap adds some special rules and ‘reinforcements’ so that memory will not be corrupt.
It might be useful when coding in raw C winApi style (when you use raw HeapAlloc calls), but probably not when using C++ and CRT/STD.

CRT has its own memory validation mechanisms (read more at msdn) so windows Debug Heap is doing additional, mostly redundant checks.

Options

What can we do about this whole feature? Fortunately, we have an option to disable it!

Disabling debug heap in Visual Studio

Any drawbacks of this approach?

Obviously there is no additional checking… but since you’ve probably checked your app in Debug version, and since there are additional checks in CRT/STD no problems should occur.

Also, in the latest Visual Studio 2015 this feature is disabled by default (it is enabled in the previous versions). This suggests that we should be quite safe.

On the other hand, when you rely solely on WinAPI calls and do some advanced system programming then DebugHeap might help…

Summary

Things to remember:
Use "_NO_DEBUG_HEAP" to increase performance of your debugging sessions!.

As I mentioned in the beginning, I was quite surprised to see so different results when running F5 in release mode VS running the app alone. Debugger usually adds some performance hit, but not that huge! I can expect a slow down in a debug build, but not that much in release version of the application.

Debug Heap is attached every time: in debug builds and in release as well. And it’s not that obvious. At least we can disable it.

Fortunately Debug Heap is disabled by default in Visual Studio 2015 - this shows that MS Team might be wrong when they enabled Debug Heap by default in the previous versions of Visual Studio.

Resources

C++ Status at the end of 2015

$
0
0

Maybe I’ll be boring with this note, but again I need to write that this was another good year for C++!
Here’s a bunch of facts:

  • Visual Studio 2015 was released with great support for C++14/17 and even more experimental features.
  • Long-awaited GCC 5.0 was released at the beginning of the year.
  • C++ gained a huge boost is popularity around July, 3rd stable place in the Tiobe Ranking
  • At CppCon 2015 there were some really important announcements made.
  • C++17 seems to be just around the corner!
  • And one sad news...

See my full report below.

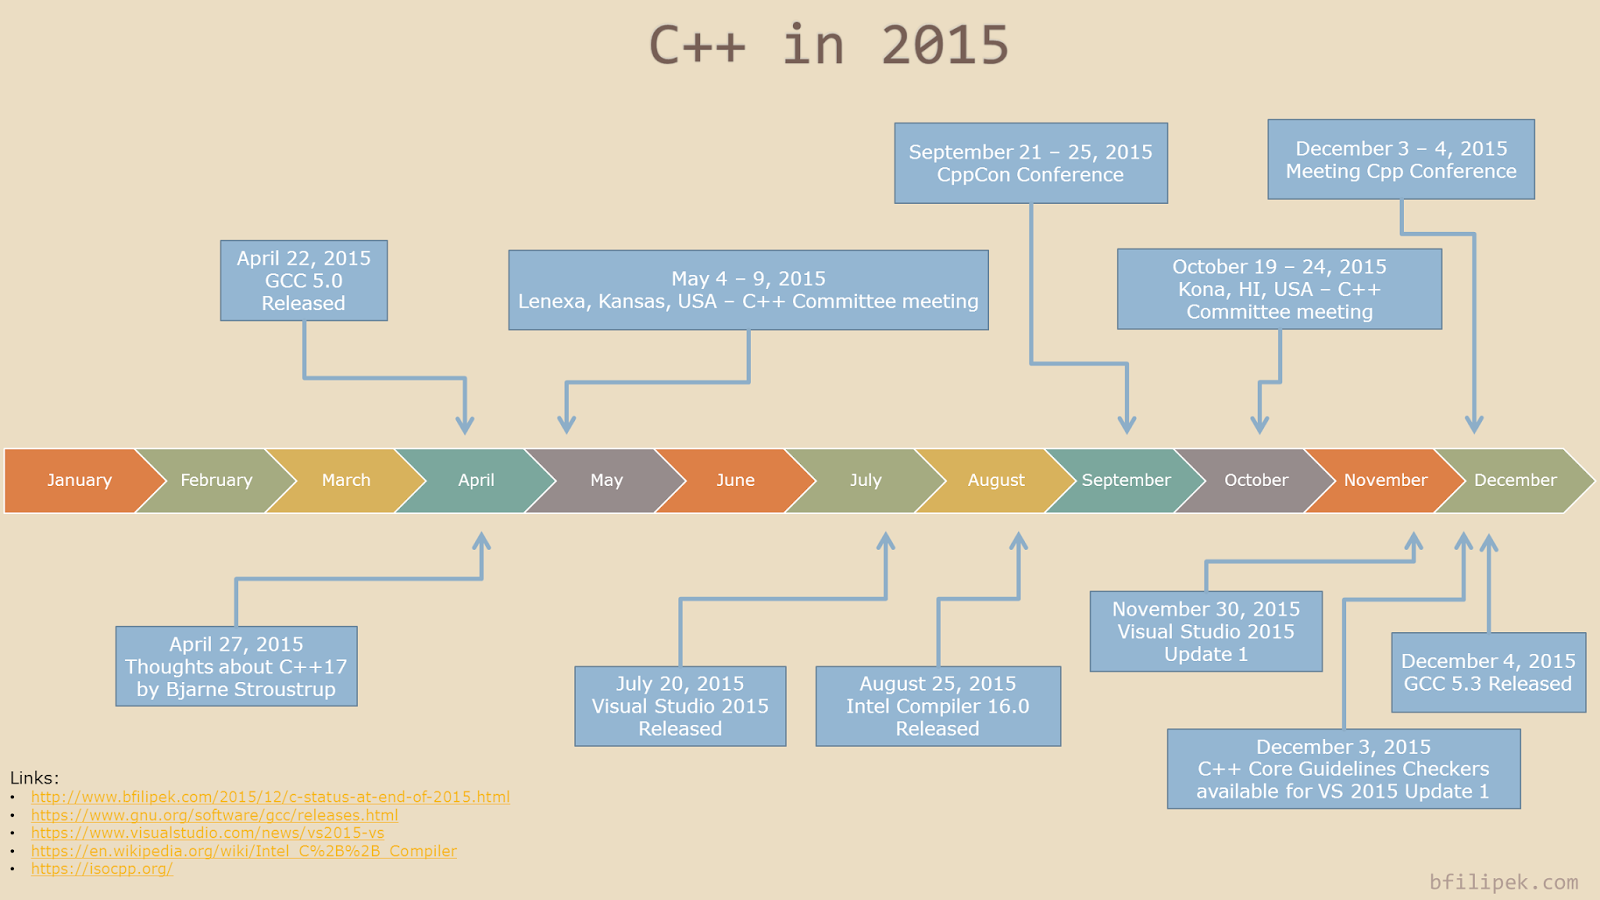
Bigger picture:

C++ in 2015 timeline

Features

Missing C++11 features

Just for the reference Clang, GCC and Intel Compiler have full support for C++11.

  • Visual Studio:
  • Update: previously I've listed here 'Atomics in signal handlers' - as missing, but I skipped one note written here by StephanTLavavej - " I previously listed "Atomics in signal handlers" as No, because despite maintaining 's implementation, I didn't know anything about signal handlers. James McNellis, our CRT maintainer, looked into this and determined that it has always worked, going back to our original implementation of in 2012. "
    • So, all in all, this feature is working as expected since 2012.

C++14 - core language features

Clang and GCC fully implement C++14.

FeatureProposalClangGCCVSIntel
Tweak to certain C++ contextual conversionsN33233.44.912*16
Binary literalsN3472Yes4.91414
Return type deduction for normal functionsN36383.44.91415
Generalized lambda capture (init-capture)N36483.44.91415
Generic (polymorphic) lambda expressionsN36493.44.914*16
Variable templatesN36513.45--
Relaxing requirements on constexpr functionsN36523.45--
Member initializers and aggregatesN36533.45-*16
Clarifying memory allocationN36643.4n/a--
Sized deallocationN37783.45*14-
[[deprecated]] attributeN37603.44.9*14*16
Single-quotation-mark as a digit separatorN37813.44.9*14*16

Changes (from the last year version) marked with a star (*)

Visual Studio 2015: the compiler is getting closer to the full conformance, they’ve implemented Sized deallocation, [[deprecated]] attribute and Single-quotation-mark as a digit separator.

Intel has also made a good progress, they’ve added support for generic lambdas, member initializers and aggregates, [[deprecated]] attribute and Single-quotation-mark as a digit separator.

C++17

Obviously most of us are waiting for something big that should happen in relatively short period of time: C++17 should be standardized! Compilers has still some work to do on the full C++11/14 conformance, but most of the features are there for us. Most of the compiler teams actually moved into experimenting with some of the new features.

But what is C++17?

To get the best idea it’s probably best to read “Thoughts about C++17” (PDF)
by Bjarne Stroustrup. He mentioned the tree top priorities:

  • Improve support for large-scale projects
  • Add support for higher-level concurrency
  • Simplify core language use, improve STL

Moreover, C++17 is a major release, so people expect to get something important, not some little updates.

What’s on the list then?

Here is a great and detailed overview of what features might be ready for Botond’s C++17: Trip Report: C++ Standards Meeting in Kona, October 2015

Also, the features that won’t be ready will be shipped with C++20 that is planned to be a minor release. C++20 will complete C++17 as C++14 completes C++11.

Core Guidelines

At CppCon in the keynote presentation, Bjarne made an important announcement: Core guidelines!

Full guidelines can be found at github - isocpp/cppcoreguidelines, here is a quote from the introduction:

The C++ Core Guidelines are a collaborative effort led by Bjarne
Stroustrup, much like the C++ language itself. They are the result of
many person-years of discussion and design across a number of
organizations. Their design encourages general applicability and broad
adoption but they can be freely copied and modified to meet your
organization’s needs.

The aim of the guidelines is to help people to use modern C++
effectively. By “modern C++” we mean C++11 and C++14 (and soon C++17).
In other words, what would you like your code to look like in 5 years’
time, given that you can start now? In 10 years’ time?

Since the language is getting more complicated, modern, and even simplified at the same time it’s very welcomed to have a guide that will help to write good modern C++ code. Some older rules are now superseded by new approaches - for example RAII. It’s not that easy especially when you’re working on a legacy code and you’d like to add some fresh modern code into your project.
Guidelines are developed collaboratively, so it seems the rules should be practical.

The main keynote from Bjarne:

It was later described with working examples by Herb in his talk:

Notes on the C++ Standard

This year, as expected, there were two meetings: Kona in October and Lenexa in April.

The Fall meeting:

And here are the links from Spring meetings:

Next meeting are announced, it will be in Jacksonville, Florida in February. Then, there will be a very important meeting in Oulu, Finland at the end of June - important because Draft for C++17 will be voted there.

Compiler Notes

Visual Studio

GCC

Clang

Intel compiler

Conferences

This year two C++ conferences gained my attention: CppCon and MettingCpp.

CppCon

MeetingCpp

The first keynote:

And the second one:

Books

Here are some books about C++ that appeared in 2015
Alert! Amazon links below :)

Summary

My top events for C++ in 2015:
* Core Guidelines announcement
* VS 2015 release
* Lots of experimental features available to play.

As we can see C++ Standardization Committee is working hard to bring us C++17 that really includes huge and important features. At the end of the next year we should be seeing the full C++17 draft accepted.
Developers seem to like the current atmosphere around C++ and it was reflected in the July’s Tiobe Rank, where C++ reached 8%! Maybe the term “C++ renaissance” is not a myth…

What’s even better, we have lots of experimental work already in our compilers. We can play with modules, concepts, ranges, co-routines… This might not be safe for your production code, but definitely it’s great for learning and testing this new stuff. Feedback gained from those early-staged implementation might be very valuable when the final spec is realized. And, I hope, the committee will include that feedback in their work.

VisualStudio team become more open, they’ve done huge improvements with the latest release of VS 2015. Not only you can create multiplafrotm apps (thanks to embedding Clang) but also they are quite fast with new, experimental C++ features.

All compilers implement core parts of C++11/14, so there is no excuse not to write modern C++! With the help of Core Guidelines this task should be much easier. Please add it to your new year’s resolution list! :)

The Sad News
Just a few hours after I published my original post there was a message posted from Scott Meyers on his blog: "} // good to go"... that basically says that Scott Meyers is retiring from the world of C++ ;/
See more fresh comments on this reddit thread: link here

What do you think?

  • What do you think about C++ in 2015?
  • What was the most important event/news for you?
  • Did I miss something? Let me know in comments
Thanks for comments:

Please also vote in my poll below:

What features would you like to see in C++17?
 
pollcode.com free polls

Simple Performance Timer

$
0
0

When you’re doing a code profiling session it’s great to have advanced and easy to use tools. But what if we want to do some simple test/benchmark? Maybe a custom code would do the job?

Let’s have a look at simple performance timer for C++ apps.

Intro

A task might sound simple: detect what part of the code in the ABC module takes most of the time to execute. Or another case: compare execution time between the Xyz algorithm and Zyx.

Sometimes, instead of using and setting up advanced profiling tools I just use my custom profiling code. Most of the time I only need a good timer and a method to print something on the screen/output. That’s all. Usually it can be enough for most of cases… or at least a good start for more deep and advanced profiling session.

Little Spec

What do we want?

  • I’d like to measure execution time of any function in my code and even part of a routine.
  • The profiling code that needs to be added to routines must be very simple, ideally just one line of additional code.
  • There should be a flag that will disable/enable profiling globally

Timer

Good timer is the core of our mechanism.

Here is a brief summary of available options:

  • RDTSC instruction - it returns number of CPU cycles since the reset, 64 bit variable. Using this instruction is very low-level, but probably this is not what we need. Cpu cycles aren’t steady time events: power saving, context switching… See an interesting read from RandomAscii: rdtsc in the Age of Sandybridge.
  • High performance timer on Windows - see Acquiring high-resolution time stamps. It gives highest possible level of precision (<1us).
  • GetTickCount - 10 to 16 milliseconds of resolution
  • timeGetTime - uses system clock (so the same resolution as GetTickCount), but resultion can be increased up to even 1ms (via timeBeginPeriod). See full comparision between GetTickCount vs timeGetTime at RandomASCII blog
  • std::chrono - finally, there are timers from STL library!
    • system_clock - system time
    • steady_clock - monotonic clock, see the diff between system_clock at this SO question
    • high_resolution_clock - highest possible resolution, multiplatform! Warning: it might be alias for system or steady clock… depending on the system capabilities.

Obviously we should generally use std::high_resolution_clock, unfortunately it’s not working as expected in VS2013 (where I developed the original solution).
This is fixed in VS 2015: see this blog post from vs team.

In general, if you’re using the latest compilers/libraries then std::chrono will work as expected. If you have some older tools, then it’s better to double-check.

Output

Where do we want to get the results? In simple scenarios we might just use printf/cout. Other option is to log directly to some log file or use Debug View.

Performance cost

Measuring some effect can alter the results. How much elapsed time is affected by our profiling code? If it takes proportionally quite a long time (against the code that we measure) we might need to defer the process somehow.

For example if I want to measure execution time for just a small method that runs in a few microseconds, writing output to a file (each time the method is called) might be longer then the whole function!

So we can measure just the elapsed time (assuming that it’s very fast) and defer the process of writing the data to output.

Solution

Simple as it is:

void longFunction()
{
SIMPLEPERF_FUNCSTART;

SIMPLEPERF_START("loop ");
for (int i = 0; i < 10; ++i)
{
SIMPLEPERF_SCOPED("inside loop ");
//::Sleep(10);
internalCall();
}
SIMPLEPERF_END;
}

which shows at the end of the program:

main : 14837.797000
longFunction : 0.120000
loop : 0.109000
inside loop : 0.018000
internalCall : 0.008000
inside loop : 0.011000
internalCall : 0.009000
...
inside loop : 0.005000
internalCall : 0.002000
shortMethod : 15.226000
loop : 15.222000

We have 3 basic macros that can be used:
* SIMPLEPERF_FUNCSTART - just put it at the beginning of the function/method. It will show the name of the function and print how long it took to execute
* SIMPLEPERF_SCOPED(str) - place it at the beginning of a scope
* SIMPLEPERF_START(str) - place it inside a function, as a custom marker, where you don’t have a scope opened.
* SIMPLEPERF_END - need to close SIMPLEPERF_START
* Plus:
* add #include "SimplePerfTimer.h
* enable it by setting #define ENABLE_SIMPLEPERF (also in SimplePerfTimer.h for simplicity)

Additionally the code supports two modes:

  • Immediate: will print just after the elapsed time is obtained. Printing might affect some performance.
  • Retained: will collect the data so that it can be shown at the end of the program.

In retained mode we can call:

  • SIMPLEPERF_REPORTALL - show the current data
  • SIMPLEPERF_REPORTALL_ATEXIT - will show the data but after main() is done. Can be called any time in the program actually.

The flag #define SIMPLEPERF_SHOWIMMEDIATE true need to be set to true to use retained mode.

Problems

The whole timer might not work in multicore, multithreaded code since it does not use any critical sections to protected shared data, or doesn’t care about thread that the code is running. If you need more advanced timer then you will be interested in article at Preshing on Programming: A C++ Profiling Module for Multithreaded APIs.

Implementation details

github repo: github.com/fenbf/SimplePerfTimer

The core idea for the timer is to use destructor to gather the data. This way when some timer object goes out of the scope we’ll get the data. This is handy especially for whole functions/explicit scopes.

{ // scope start
my_perf_timer t;
}

In a basic immediate form the timer just saves time (using QueryPerformanceCounter) in the constructor and then in the destructor measures end time and prints it to the output.

In the retained mode we also need to store that data for the future use. I simply create a static vector that adds a new entry in the constructor and then fills the final time in the destructor. I also take care about indents, so that the output looks nicely.

In the repo there is also a header only version (a bit simplified, using only immediate mode): see SimplePerfTimerHeaderOnly.h

Here is a picture showing timer results in Debug view:
enter image description here

Todo

  • Add file/line information when printing the data?
  • Use std::chrono for VS2015/GCC version

Summary

This post described a handy performance timer. If you just need to check execution time of some code/system just include a header (+and add related .cpp file) and use SIMPLEPERF_FUNCSTART or SIMPLEPERF_START(str)/END in analysed places. The final output should help you find hotspots… all without using advanced tools/machinery.

Once again the repo: github.com/fenbf/SimplePerfTimer

Resources


Micro benchmarking libraries for C++

$
0
0

benchmarking

After I finished my last post about a performance timer, I got a comment suggesting other libraries - much more powerful than my simple solution. Let’s see what can be found in the area of benchmarking libraries.

Intro

The timer I’ve introduced recently is easy to use, but also returns just the basic information: elapsed time for an execution of some code… what if we need more advanced data and more structured approach of doing benchmarks in the system?

My approach:

timer start = get_time();

// do something
// ...

report_elapsed(start - get_time());

The above code lets you do some basic measurements to find potential hotspots in your application. For example, sometimes I’ve seen bugs like this (document editor app):

BUG_1234: Why is this file loading so long? Please test it and tune the core system that causes this!

To solve the problem you have to find what system is responsible for that unwanted delay. You might use a profiling tool or insert your timer macros here and there.

After the bug is fixed, you might leave such code (in a special profile build setup) and monitor the performance from time to time.

However, the above example might not work in situations where performance is critical: in subsystems that really have to work fast. Monitoring it from time to time might give you even misleading results. For those areas it might be better to implement a microbenchmarking solution.

Microbenchmarking

From wikipedia/benchmark

Component Benchmark / Microbenchmark (type):

  • Core routine consists of a relatively small and specific piece of code.
  • Measure performance of a computer’s basic components
  • May be used for automatic detection of computer’s hardware parameters like number of registers, cache size, memory latency, etc.

Additional answer from SO - What is microbenchmarking?

In other words, microbenchmark is a benchmark of an isolated component, or just a method. Quite similar to unit tests. If you have a critical part of your system, you may want to create such microbenchmarks that execute elements of that system automatically. Every time there is a ‘bump’ in the performance you’ll know that quickly.

I’ve seen that there is a debate over the internet (at least I’ve seen some good questions on SO related to this topic…) whether such microbenchmarking is really important and if it gets valuable results. Nevertheless it’s worth trying or at least it’s good to know what options do we have here.

BTW: here is a link to my question on reddit/cpp regarding micro benchmarking: Do you use microbenchmarks in your apps?

Since it’s a structured approach, there are ready-to-use tools that enables you to add such benchmarks quickly into your code.

I’ve tracked the following libraries:

  • Nonius
  • Hayai
  • Celero
  • Google Benchmark(*)

Unfortunately with Google Benchmark I couldn’t compile it on Windows, so my notes are quite limited. Hopefully this will change when this library is fully working on my Windows/Visual Studio environment.

Test Code

Repo on my github: fenbf/benchmarkLibsTest

To make it simple, I just want to measure execution of the following code:

auto IntToStringConversionTest(int count)
{
vector<int> inputNumbers(count);
vector<string> outNumbers;

iota(begin(inputNumbers), end(inputNumbers), 0);
for (auto &num : inputNumbers)
outNumbers.push_back(to_string(num));

return outNumbers;
}

and the corresponding test for double:

auto DoubleToStringConversionTest(int count)
{
vector<double> inputNumbers(count);
vector<string> outNumbers;

iota(begin(inputNumbers), end(inputNumbers), 0.12345);
for (auto &num : inputNumbers)
outNumbers.push_back(to_string(num));

return outNumbers;
}

The code creates a vector of numbers (int or double), generates numbers from 1 up to count (with some offset for the double type), then converts those numbers into strings and returns the final vector.

BTW: you might wonder why I’ve put auto as the return type for those functions… just to test new C++14 features :) And it looks quite odd, when you type full return type it’s clearer what the method returns and what it does…

Hayai library

Github repo: nickbruun/hayai, Introductory article by the author

Library was implemented around the time the author was working on a content distribution network. He often needed to find bottlenecks in the system and profiling become a key thing. At some point, instead of just doing stop-watch benchmarking… he decided to go for something more advanced: a benchmarking framework where the team could test in isolation crucial part of the server code.

Hayai - “fast” in Japanese, is heavily inspired by Google Testing Framework. One advantage: it’s a header only, so you can quickly add it to your project.

Update: After I’ve contacted the author of the library it appears this tools is more powerful than I thought! It’s not documented so we need to dig into the repo to find it :)

A simplest example:

#include <hayai.hpp>

BENCHMARK(MyCoreTests, CoreABCFunction, 10, 100)
{
myCoreABCFunction();
}
  • first param: group name
  • second: test name
  • third: number of runs
  • fourth: number of iterations

In total myCoreABCFunction will be called num_runs x num_iterations. Time is measured for each run. So if your code is small and fast you might increase the number of iterations to get more reliable results.

Or an example from my testing app:

#include "hayai.hpp"

BENCHMARK(ToString, IntConversion100, 10, 100)
{
IntToStringConversionTest(TEST_NUM_COUNT100);
}

BENCHMARK(ToString, DoubleConversion100, 10, 100)
{
DoubleToStringConversionTest(TEST_NUM_COUNT100);
}

int main()
{
// Set up the main runner.
::hayai::MainRunner runner;

// Parse the arguments.
int result = runner.ParseArgs(argc, argv);
if (result)
return result;

// Execute based on the selected mode.
return runner.Run();
}

When you run this, we’ll get the following possible results:

hayai library output

As you can see we get average/min/max for runs and also for iterations.

In more advanced scenarios there is an option to use fixtures (with SetUp() and TearDown() virtual methods).

If we run the binary with --help parameter we get the this list of options:
additional hayai runner options

In terms of output, the library can use only console (correction). It can output to json, junit xml or normal console output. So it’s possible to take the data and analyse it in a separate tool.

Celero library

Github repository: DigitalInBlue/Celero, CodeProject article, Another CodeProject article with examples

Celero goes a bit further and introduces concept of the baseline for the testing code. You should first write your basic solution, then write another benchmarks that might improve (or lower) the performance of the baseline approach. Especially useful when you want to compare between several approaches of a given problem. Celero will compare between all the versions and the baseline.

The library is implemented using the latest C++11 features and it’s not header only. You have to first build a library and link to your project. Fortunately it’s very easy because there is a CMake project. Works in GCC, Clang and VisualStudio and other modern C++ compilers.

Example from my testing app:

#include "celero\Celero.h"
#include "../commonTest.h"

CELERO_MAIN;

BASELINE(IntToStringTest, Baseline10, 10, 100)
{
IntToStringConversionTest(TEST_NUM_COUNT10);
}

BENCHMARK(IntToStringTest, Baseline1000, 10, 100)
{
IntToStringConversionTest(TEST_NUM_COUNT1000);
}

BASELINE(DoubleToStringTest, Baseline10, 10, 100)
{
DoubleToStringConversionTest(TEST_NUM_COUNT10);
}

BENCHMARK(DoubleToStringTest, Baseline1000, 10, 100)
{
DoubleToStringConversionTest(TEST_NUM_COUNT1000);
}

Similarly to Hayai library, we can specify the group name, test name number of samples (measurements) to take and number of operations (iterations) the the code will be executed.

What’s nice is that when you pass 0 as the number of samples, Celero will figure out the proper number on its own.

The output:
Celero library sample output

Other powerful features:

  • As in other solutions, there is an option to use fixtures in your tests.
  • Celero gives you a code celero::DoNotOptimizeAway that can be used to make sure the compiler won’t remove your code from the final binary file.
  • Celero can automatically run threaded benchmarks.
  • There is an option to run benchmark in time limit (not execution number limit), so you can run your benchmark for 1 second for example.
  • The library lets you define a problem space: for example when you’re testing an algorithm you can provide several N values and for each N complete set of benchmarks will be executed. This might be useful for doing graphs from your results.
  • You can output data to CSV, JUnit xml, or even archive old result file.

Nonius library

The main site - nonius.io, Github repo - rmartinho/nonius

Nonius (in fact it’s a name of a astrolabe device) is a library that goes a bit beyond the basic measurements and introduces some more statistics to our results.

One outcome of this idea is that you don’t have to pass number of runs or iterations of your code. The library will figure it out (Celero had some part of that idea implemented, in Hayai there is no such option yet).

Nonius runs your benchmark in the following steps:

  1. Taking environmental probe: like timer resolution. This doesn’t need to be executed for each benchmark.
  2. Warm up and estimation: your code is run several times to estimate how many times it should be finally executed.
  3. The main code execution: benchmark code is executed number of times (taken from the step 2) and then samples are computed.
  4. Magic happens: bootstapping is run over the collected samples

The library uses modern C++ and is header only. I had no problem in adding this to my sample project. Maybe there was one additional step: you need to have boost installed somewhere, because the library depends on it. Nonius uses std::chrono internally, but if you cannot rely on it (for example because you’re using VS2013 which has a bug in the implementation of std::chrono) then you might define NONIUS_USE_BOOST_CHRONO and then it will use Boost libraries.

Example from my testing app:

#define NONIUS_RUNNER
#include "nonius.h++"
#include "../commonTest.h"


NONIUS_BENCHMARK("IntToStringTest1000", []
{
IntToStringConversionTest(TEST_NUM_COUNT1000);
})

{
DoubleToStringConversionTest(TEST_NUM_COUNT1000);
})

we get the following output:
Nonius library sample output to console

Here we have to read the output more carefully.

I’ve mentioned that after the data is collected bootstrapping is executed, so we get a bit more detailed results:

  • there is a mean, upper bound and lower bound of the samples
  • standard deviation
  • outliers: samples that are too far from the mean and they may disturb the final results.

As you can see you get a very interesting data! If, for example, some unexpected job was running (a video player, power saving mode, …) during the benchmark execution you should caught it because outliers will point that the results are probably invalid or heavily disturbed.

By specifying -r html -o results.html we can get a nice graph (as one HTML page):

Nonius library sample output chart

Other features:

  • Fixtures can be used
  • if the benchmark consists of one function call like myCompute() you can just write return myCompute() and the library guarantees that the code won’t be optimized and removed.
  • nonius::chronometer meter input parameter that can be used to perform more advanced tests.
  • there is a method to separate construction and destruction code from the actual code: nonius::storage_for<T>

Google Benchmark library

Windows Build not ready - https://github.com/google/benchmark/issues/7

https://github.com/google/benchmark

to be finished…

If you have some thoughts on google benchmark I can happily insert them into that missing part of the article :)

Comparison:

featureNoniusgoogle/benchmark*HayaiCelero
Latest update29 Oct 201531 Dec 201521 Dec 201513 Nov 2015
Header onlyYesNoYesNo
DependenciesBoost & STLjust STLjust STL
FixturesYesYesYesYes
Statsruns bootstrapping?simplecompare against the baseline, can evaluate number of runs, more…
Outputconsole, csv, junit xml, html?console, json, junit xmlconsole, csv, junit xml
Noteshelps in testing creation and destruction,not working on Windows ;(benchmark filtering, shufflingcan execute test with time limit, threaded tests, problem space…

Summary

In this article I went through three libraries that lets you create and execute micro benchmarks. All of those libraries are relatively easy to add into your project (especially Hayai and Nonius which are header only). To use Celero you just have to link to its lib.

Hayai seems to be the simplest solution out of those three. It’s very easy to understand and but you get a decent set of functionality: console, junit xml or json output, benchmarks randomization order, benchmark filtering.

Celero has lots of features, probably I didn’t cover all of them in this short report. This library seems to be the most advanced one. It uses Baselines for the benchmarks. Although the library is very powerful it’s relatively easy to use and you can gradually use some more complex features of it.

Nonius is probably the nicest. If offers powerful statistic tools that are used to analyse samples, so it seems it should give you the most accurate results. I was also impressed by the number of output formats: even html graph form.

Your turn

  • Are you using described benchmarking libraries? In what parts of the application?
  • Do you know any other? or maybe you’re using a home grown solution?
  • Or maybe micro benchmarking is pointless?

Revisiting An Old Benchmark - Vector of objects or pointers

$
0
0

Revisiting old benchmark code

Around one and a half year ago I did some benchmarks on updating objects allocated in a continuous memory block vs allocated individually as pointers on the heap: Vector of Objects vs Vector of Pointers. The benchmarks was solely done from scratch and they’ve used only Windows High Performance Timer for measurement. But, since recently I’m interested in more professional benchmarking libraries it would be good to revisit my old approach and measure the data again.

Intro

Just to recall we try to compare the following cases:

  • std::vector<Object> - memory is allocated on the heap but std::vector guarantees that the memory block is continuous. Thus, iterations that use those objects should be quite fast.
  • std::vector<std::shared_ptr<Object>> - this simulates array of references from C#. You have an array, but each element is allocated in a different place in the heap.

Or visually, we compare:
vector of objects
VS
vector of pointer to objects

Each particle is 72bytes:

class Particle
{
private:
float pos[4];
float acc[4];
float vel[4];
float col[4];
float rot;
float time;

size = sizeof(float)*18 = 72

Additionally, we need to take into account address randomization. It appears that if you create one pointer after another they might end up quite close in the memory address space. To mimic real life case we can randomize such pointers so they are not laid out consecutively in memory.

My last results, on older machine (i5 2400) showed that pointers code for 80k of objects was 266% slower than the continuous case. Let’s see what we get with new machine and new approach…

New tests are made on

  • Intel i7 4720HQ, 12GB Ram, 512 SSD, Windows 10.

Using Nonius library

In Nonius we can use a bit more advanced approach and use chronometer parameter that might be passed into the Benchmark method:

NONIUS_BENCHMARK("Test", [](nonius::chronometer meter) {
// setup here

meter.measure([] {
// computation...
});
});

Only the code marked as //computation (that internal lambda) will be measured. Such benchmark code will be executed twice: once during the estimation phase, and another time during the execution phase.

For our benchmark we have to create array of pointers or objects before the measurement happens:

NONIUS_BENCHMARK("ParticlesStack", [](nonius::chronometer meter) 
{
vector<Particle> particles(NUM_PARTICLES);

for (auto &p : particles)
p.generate();

meter.measure([&particles] {
for (size_t u = 0; u < UPDATES; ++u)
{
for (auto &p : particles)
p.update(DELTA_TIME);
}
});

and the heap test:

NONIUS_BENCHMARK("ParticlesHeap", [](nonius::chronometer meter) 
{
vector<shared_ptr<Particle>> particles(NUM_PARTICLES);
for (auto &p : particles)
{
p = std::make_shared<Particle>();
}

for (size_t i = 0; i < NUM_PARTICLES / 2; ++i)
{
int a = rand() % NUM_PARTICLES;
int b = rand() % NUM_PARTICLES;
if (a != b)
swap(particles[a], particles[b]);
}

for (auto &p : particles)
p->generate();

meter.measure([&particles] {
for (size_t u = 0; u < UPDATES; ++u)
{
for (auto &p : particles)
p->update(DELTA_TIME);
}
});
});

Additionally I got the test where the randomization part is skipped.

Results

Nonius performs some statistic analysis on the gathered data. When I run my tests using 10k particles, 1k updates I got the following output:

benchmarking with Nonius library, particles

  • Particles vector of objects: mean is 69ms and variance should be ok.
  • Particles vector of pointers: mean is 121ms and variance is not affected by outliers.
  • Particles vector of pointers but not randomized: mean is 90ms and the variance is also only a little disturbed.

The great thing about Nonius is that you don’t have to specify number of runs and iterations… all this is computed by Nonius. You just need to write a benchmark that is repeatable.

And the generated chart:

chart generated by Nonius library for a particle experiment

Interesting thing is when I run the same binary on the same hardware, but with just battery mode (without power adapter attached) I got slightly different data:

disturbed particles benchmark, Nonius library

For all our tests the variance is severely affected, it’s clearly visible on the chart below:

chart of disturbed particle benchmark, Nonius library

Of course, running benchmarks having on battery is probably not the wises thing… but Nonius caught easily that the data is highly disturbed.

Unfortunately I found it hard to create a series of benchmarks: like when I want to test the same code but with different data set. In our particles example I just wanted to test with 1k particles, 2k…. 10k. With Nonius I have to write 10 benchmarks separately.

Using Celero library

With the Celero library we might create a bit more advanced scenarios for our benchmarks. The library has thing called ‘problem space’ where we can define different data for benchmarks. The test code will take each element of the problem space and run benchmark again. This works perfectly for particles test code: we can easily test how algorithm performs using 1k of particles, 2k… 10k without writing code separately.

First of all we need to define a fixture class:

class ParticlesFixture : public celero::TestFixture
{
public:
virtual vector<pair<int64_t, uint64_t>> getExperimentValues() const override
{
vector<pair<int64_t, uint64_t>> problemSpace;

const int totalNumberOfTests = 10;

for (int i = 0; i < totalNumberOfTests; i++)
{
problemSpace.push_back(make_pair(1000 + i * 1000, uint64_t(0)));
}

return problemSpace;
}
};

The code above returns just a vector of pairs {1k, 0}, {2k, 0}, … {10k, 0}. As you can see we can even use it for algorithms that uses two dimensional data range…

Then we can define fixture classes for the final benchmarks:

class ParticlesObjVectorFixture : public ParticlesFixture
{
public:
virtual void setUp(int64_t experimentValue) override
{
particles = vector<Particle>(experimentValue);

for (auto &p : particles)
p.generate();
}

/// After each run, clear the vector
virtual void tearDown()
{
this->particles.clear();
}

vector<Particle> particles;
};

and vector of pointers, randomized or not:

class ParticlesPtrVectorFixture : public ParticlesFixture
{
public:
virtual bool randomizeAddresses() { return true; }

virtual void setUp(int64_t experimentValue) override
{
particles = vector<shared_ptr<Particle>>(experimentValue);

for (auto &p : particles)
p = make_shared<Particle>();

if (randomizeAddresses())
{
// randomize....
}

for (auto &p : particles)
p->generate();
}

/// After each run, clear the vector
virtual void tearDown()
{
this->particles.clear();
}

vector<shared_ptr<Particle>> particles;
};

then the version without randomization:

class ParticlesPtrVectorNoRandFixture : public ParticlesPtrVectorFixture
{
public:
virtual bool randomizeAddresses() { return false; }
};

And now the tests itself:

BASELINE_F(ParticlesTest, ObjVector, ParticlesObjVectorFixture, 20, 1)
{
for (size_t u = 0; u < UPDATES; ++u)
{
for (auto &p : particles)
p.update(DELTA_TIME);
}
}

BENCHMARK_F(ParticlesTest, PtrVector, ParticlesPtrVectorFixture, 20, 1)
{
for (size_t u = 0; u < UPDATES; ++u)
{
for (auto &p : particles)
p->update(DELTA_TIME);
}
}

BENCHMARK_F(ParticlesTest, PtrVectorNoRand, ParticlesPtrVectorNoRandFixture, 20, 1)
{
for (size_t u = 0; u < UPDATES; ++u)
{
for (auto &p : particles)
p->update(DELTA_TIME);
}
}

quite simple… right? :)
Some of the code is repeated, so we could even simplify this a bit more.

Results

With this more advanced setup we can run benchmarks several times over different set of data. Each benchmark will be executed 20 times (20 measurements/samples) and only one iteration (in Nonius there was 100 samples and 1 iteration).

Here are the results:

Particle benchmark using Celero library, 20 samples

The values for a given benchmark execution is actually the min of all samples.

We get similar results to the data we get with Nonius:

  • for 10k particles: ObjVector is around 66ms, PtrVector is 121ms and PtrVectorNoRand is 89ms

Celero doesn’t give you an option to directly create a graph (as Nonius), but it can easily output csv data. Then we can take it and use a spreadsheed to analyze it and produce charts.
Here’s the corresponding graph (this time I am using mean value of of gathered samples).

particles benchmark with Celero librayr

In the generated CSV there are more data than you could see in the simple Console table.
There are:
* Group,
* Experiment,
* Problem Space
* Samples
* Iterations
* Baseline us/Iteration
* Iterations/sec
* Min (us)
* Mean (us)
* Max (us)
* Variance
* Standard Deviation
* Skewness
* Kurtosis
* Z Score

By looking at the data you can detect if your samples got a proper distribution or if they were disturbed. When I run Celero binary in battery mode then I could spot the difference between AC mode. So we can detect the same problems of our data as we’ve noticed with Nonius.

Summary

With this post I wanted to confirm that having a good benchmarking library is probably better that your own simple solution. Libraries like Nonius are easy to use and can pick strange artefacts in the results that might be invisible using just a stopwatch approach. With Celero we get even more flexibility and benchmarks can be executed over different range of data.

See my previous post about those benchmarking libraries: Micro benchmarking libraries for C++

Source code available on githib: github/fenbf/benchmarkLibsTest

Notes on C++ SFINAE

$
0
0

Starting with C++ SFINAE

This time I’d like to tackle a bit more complex problem: SFINAE. I’m not using this paradigm on a daily basis, but I’ve stumbled across it several times and I thought it might be worth trying to understand this topic.

  • What is SFINAE?
  • Where can you use it?
  • Do you need this on a daily basis?

Let’s try to answer those questions.

In the article:

Update: Look here for the follow up blog posts.

Note: I'd like to thank kj for reviewing this article and providing me a valuable feedback from the early stage of the writing process. Also many thanks goes to GW who reviewed the beta version.

Intro

First thing: if you have more time, please read An introduction to C++’s SFINAE concept: compile-time introspection of a class member by Jean Guegant. This is an awesome article that discusses SFINAE more deeply that I’ve ever found in other places. Highly recommended resource.

Still reading? Great! :) Let’s start with some basic ideas behind this concept:

Very briefly: the compiler can actually reject code that “would not compile” for a given type.

From Wiki:

Substitution failure is not an error (SFINAE) refers to a situation in C++ where an invalid substitution of template parameters is not in itself an error. David Vandevoorde first introduced the acronym SFINAE to describe related programming techniques.

We’re talking here about something related to templates, template substitution and compile time only… possibly quite a scary area!

A quick example: see it also on coliru online cpp compiler

struct Bar
{
typedef double internalType;
};

template <typename T>
typename T::internalType foo(const T& t) {
cout << "foo<T>"<< endl;
return 0;
}

int main()
{
foo(Bar());
foo(0); // << error!
}

We have one awesome template function that returns T::internalType and we call it with Bar and int param types.

The code, of course, will not compile. The first call of foo(Bar());is a proper construction, but the second call generates the following error (GCC):

 no matching function for call to 'foo(int)'
...
template argument deduction/substitution failed:

When we make a simple correction and provide a suitable function for int types. As simple as:

int foo(int i) { cout << "foo(int)"<< endl; return 0; }

The code can be built and run.

Why is that?

Obviously, when we added an overloaded function for the int type, the compiler could find a proper match and invoke the code. But in the compilation process the compiler also ‘looks’ at the templated function header. This function is invalid for the int type, so why was there not even a warning reported (like we got when there was no second function provided)? In order to understand this, we need to look at the process of building the overload resolution set for a function call.

Overload Resolution

When the compiler tries to compile a function call (simplified):

  • Perform a name lookup
  • For function templates the template argument values are deduced from the types of the actual arguments passed in to the function.
    • All occurrences of the template parameter (in the return type and parameters types) are substituted with those deduced types.
    • When this process leads to invalid type (like int::internalType) the particular function is removed from the overload resolution set. (SFINAE)
  • At the end we have a list of viable functions that can be used for the specific call. If this set is empty, then the compilation fails. If more than one function is chosen, we have an ambiguity. In general, the candidate function, whose parameters match the arguments most closely is the one that is called.

Compiling a function call

In our example: typename T::internalType foo(const T& t) was not a good match for int and it was rejected from overload resolution set. But at the end, int foo(int i) was the only option in the set, so the compiler did not reported any problems.

Where can I use it?

I hope you get a basic idea what SFINAE does, but where can we use this technique? A general answer: whenever we want to select a proper function/specialization for a specific type.

Some of the examples:

  • Call a function when T has a given method (like call toString() if T has toString method)
  • Nice example here at SO of detecting count of object passed in initializer list to a constructor.
  • Specialize a function for all kind of type traits that we have (is_integral, is_array, is_class, is_pointer, etc… more traits here)
  • Foonathan blog: there is an example of how to count bits in a given input number type. SFINAE is part of the solution (along with tag dispatching )
  • Another example from foonathan blog - how to use SFINAE and Tag dispatching to construct range of objects in a raw memory space.

enable_if

One of the main uses of SFINAE can be found in enable_if expressions.

enable_if is a set of tools that internally use SFINAE. They allow to include or exclude overloads from possible function templates or class template specialization.

For example:

template <class T>
typename enable_if<is_arithmetic<T>::value, T>::type
foo(T t)
{
cout << "foo<arithmetic T>"<< endl;
return t;
}

This function ‘works’ for all the T types, that are arithmetic (int, long, float…). If you pass other type (for instance MyClass), it will fail to instantiate. In other words, template instantiation for non-arithmetic types are rejected from overload resolution sets. This construction might be used as template parameter, function parameter or as function return type.

enable_if<condition, T>::type will generate T, if the condition is true, or an invalid substitution if condition is false.

enable_if can be used along with type traits to provide the best function version based on the trait criteria.

As I see it, most of the time it’s better to use enable_if than your custom SFINAE versions of the code. enable_if is probably not that super nice looking expression, but this is all we have before concepts in C++17… or C++20.

Expression SFINAE

C++11 has even more complicated option for SFINAE.

n2634: Solving the SFINAE problem for expressions

Basically, this document clears the specification and it lets you use expressions inside decltype and sizeof.

Example:

template <class T> auto f(T t1, T t2) -> decltype(t1 + t2);

In the above case, the expression of t1+t2 needs to be checked. It will work for two int’s (the return type of the + operator is still int), but not for int and std::vector.

Expression checking adds more complexity into the compiler. In the section about overload resolution I mentioned only about doing a simple substitution for a template parameter. But now, the compiler needs to look at expressions and perform full semantic checking.

BTW: VS2013 and VS2015 support this feature only partially (msdn blog post about updates in VS 2015 update 1), some expressions might work, some (probably more complicated) might not. Clang (since 2.9) and GCC (since 4.4) fully handle “Expression SFINAE”.

Any disadvantages?

SFINAE, enable_if are very powerful features but also it’s hard to get it right. Simple examples might work, but in real-life scenarios you might get into all sorts of problems:

  • Template errors: do you like reading template errors generated by compiler? especially when you use STL types?
  • Readability
  • Nested templates usually won’t work in enable_if statements

Here is a discussion at StackOverlow: Why should I avoid std::enable_if in function signatures

Alternatives to SFINAE

  • tag dispatching - This is a much more readable version of selecting which version of a function is called. First, we define a core function and then we call version A or B depending on some compile time condition.
  • static_if - D language has this feature (see it here), but in C++ we might use a bit more complicated syntax to get similar outcome.
  • concepts (in the near future hopefully!) - All of the mentioned solutions are sort of a hack. Concepts give explicit way to express what are the requirements for a type that is accepted by a method. Still, you can try it in GCC trunk using Concepts lite implementation

One Example

To conclude my notes it would be nice to go through some working example and see how SFINAE is utilized:

Link to online compiler, coliru

The test class:

template <typename T>
class HasToString
{
private:
typedef char YesType[1];
typedef char NoType[2];

template <typename C> static YesType& test( decltype(&C::ToString) ) ;
template <typename C> static NoType& test(...);


public:
enum { value = sizeof(test<T>(0)) == sizeof(YesType) };
};

The above template class will be used to test if some given type T has ToString() method or not. What we have here… and where is the SFINAE concept used? Can you see it?

When we want to perform the test we need to write:

HasToString<T>::value

What happens if we pass int there? It will be similar to our first example from the beginning of the article. The compiler will try to perform template substitution and it will fail on:

template <typename C> static YesType& test( decltype(&C::ToString) ) ;

Obviously, there is no int::ToString method, so the first overloaded method will be excluded from the resolution set. But then, the second method will pass (NoType& test(...)), because it can be called on all the other types. So here we get SFINAE! one method was removed and only the second was valid for this type.

In the end the final enum value, computed as:

enum { value = sizeof(test<T>(0)) == sizeof(YesType) };

returns NoType and since sizeof(NoType) is different than sizeof(YesType) the final value will be 0.

What will happen if we provide and test the following class?

class ClassWithToString
{
public:
string ToString() { return "ClassWithToString object"; }
};

Now, the template substitution will generate two candidates: both test methods are valid, but the first one is better and that will be ‘used‘. We’ll get the YesType and finally the HasToString<ClassWithToString>::value returns 1 as the result.

How to use such checker class?

Ideally it would be handy to write some if statement:

if (HasToString<decltype(obj)>::value)
return obj.ToString();
else
return "undefined";

Unfortunately, all the time we’re talking about compile time checks so we cannot write such if. However, we can use enable_if and create two functions: one that will accept classes with ToString and one that accepts all other cases.

template<typename T> 
typename enable_if<HasToString<T>::value, string>::type
CallToString(T * t) {
return t->ToString();
}

string CallToString(...)
{
return "undefined...";
}

Again, there is SFINAE in the code above. enable_if will fail to instantiate when you pass a type that generates HasToString<T>::value = false.

Open questions: how to restrict the return type of the ToString method? and the full signature actually… ?

Things to remember:
SFINAE works in compile time, when template substitution happens, and allows to control overload resolution set for a function.

Summary

In this post, I showed a bit of theory behind SFINAE. With this technique (plus with enable_if), you can create specialized functions that will work on subset of types. SFINAE can control overloaded resolution set. Probably most of us do not need to use SFINAE on a daily basis. Still, it’s useful to know general rules behind it.

Some questions

Where do you use SFINAE and enable_if?

If you have nice example of it, please let me know and share your experience!

References

Thanks for comments: @reddit/cpp thread

SFINAE Followup

$
0
0

SFINAE follow up

As it appears, my last post about SFINAE wasn’t that bad! I got a valuable comments and suggestions from many people. This post gathers that feedback.

Comments from @reddit/cpp

Using modern approach

In one comment, STL (Stephan T. Lavavej) mentioned that the solution I presented in the article was from old Cpp style. What is this new and modern style then?

decltype

decltype is a powerful tool that returns type of a given expression. We already use it for:

template <typename C> 
static YesType& test( decltype(&C::ToString) ) ;

It returns the type of C::ToString member method (if such method exists in the context of that class).

declval

declval is utility that lets you call a method on a T without creating a real object. In our case we might use it to check return type of a method:

decltype(declval<T>().toString())

constexpr

constexpr suggests the compiler to evaluate expressions at compile time (if possible). Without that our checker methods might be only evaluated at run time. So the new style suggest adding constexpr for most of methods.

Akrzemi1: “constexpr” function is not “const”

void_t

Full video for the lecture:

Starting at around 29 minute, and especially around 39 minute.

This is amazing meta-programming pattern! I don’t want to spoil anything, so just watch the video and you should understand the idea! :)

detection idiom

Walter E. Brown proposes a whole utility class that can be used for checking interfaces and other properties of a given class. Of course, most of it is based on void_t technique.

Check for return type

Last time I’ve given an open question how to check for the return type of the ToString() method. My original code could detect if there is a method of given name, but it wasn’t checking for the return type.

Björn Fahller has given me the following answer: (in the comment below the article)

template <typename T>
class has_string{
template <typename U>
static constexpr std::false_type test(...) { return {};}
template <typename U>
static constexpr auto test(U* u) ->
typename std::is_same<std::string, decltype(u->to_string())>::type { return {}; }
public:
static constexpr bool value = test<T>(nullptr);
};

class with_string {
public:
std::string to_string();
};

class wrong_string{
public:
const char* to_string();
};

int main() {
std::cout
<< has_string<int>::value
<< has_string<with_string>::value
<< has_string<wrong_string>::value << '\n';
}

It will print:

010

In the test method we check if the return type of to_string() is the same as the desired one: std::string(). This class contains two levels of testing: one with SFINAE - a test if there is to_string in a given class (if not we fall-back to test(...)). Then, we check if the return type is what we want. At the end we’ll get has_string<T>::value equals to false when we pass a wrong class or a class with wrong return type for to_string. A very nice example!

Please notice that constexpr are placed before the ::value and test() methods, so we’re using a definitely more modern approach here.

More Examples

Pointers conversion:

Let’s look at the code:

 /// cast to compatible type
template<class U,
class=typename std::enable_if<std::is_convertible<T*,U*>::value>::type>
operator const Ptr<U>&() const
{
return *(const Ptr<U>*)this;
};

This is a part of Ptr.h - smart pointer class file, from oryol - Experimental C++11 multi-platform 3D engine

It’s probably hard to read, but let’s try:
The core thing is std::is_convertible<T*,U*> (see std::is_convertible reference). It’s wrapped into enable_if. Basically, when the two pointers can be converted then we’ll get a valid function overload. Otherwise compiler will complain.

Got more examples? Let me know! :)

Updated version

If I am correct and assuming you have void_t in your compiler/library, this is a new version of the code:

// default template:
template< class , class = void >
struct has_toString : false_type { };

// specialized as has_member< T , void > or sfinae
template< class T >
struct has_toString< T , void_t<decltype(&T::toString) > > : std::is_same<std::string, decltype(declval<T>().toString())>
{ };

http://melpon.org/wandbox/permlink/ZzSz25GJVaY4cvzw

Pretty nice… right? :)

It uses explicit detection idiom based on void_t. Basically, when there is no T::toString() in the class, SFINAE happens and we end up with the general, default template (and thus with false_type). But when there is such method in the class, the specialized version of the template is chosen. This could be the end if we don’t care about the return type of the method. But in this version we check this by inheriting from std::is_same. The code checks if the return type of the method is std::string. Then we can end up with true_type or false_type.

Summary

Once again thanks for your feedback. After the publication I got convinced that SFINAE/templates are even more confusing and I know nothing about them :) Still it’s worth trying to understand the mechanisms behind.

Nice C++ Factory Implementation 2

$
0
0

Nice C++ Factory Implementation

The original code from my previous post about “nice factory” did not work properly and I though there is no chance to fix it.
It appears, I was totally wrong! I got a really valuable feedback (even with source code) and now I can present this improved version.

All credits should go to Matthew Vogt, who send me his version of the code and discussed the proposed solution.

The problem

Let me quickly recall the original problem:

There is a flawed factory method:

template <typename... Ts> 
static std::unique_ptr<IRenderer>
create(const char *name, Ts&&... params)
{
std::string n{name};
if (n == "gl")
return std::unique_ptr<IRenderer>(
new GLRenderer(std::forward<Ts>(params)...));
else if (n == "dx")
return std::unique_ptr<IRenderer>(
new DXRenderer(std::forward<Ts>(params)...));

return nullptr;
}

I wanted to have one method that will create a desired object and that supports variable number of arguments (to match with constructors). This was based on the idea from the item 18 from Effective Modern C++: 42 Specific Ways to Improve Your Use of C++11 and C++14. Theoretically you could call:

auto pGL = create("gl", 10, "C:\data");
auto pDX = create("dx, "C:\shaders", 1024, 1024);

One method that is sort of a super factory.

Unfortunately, assuming each renderer has a different constructor parameter list, the code above will not compile… the compiler cannot compile just the part of this function (for one type) and skip the rest (there is no static_if).

So how to fix it?

Basic Idea

We need to provide function overloads that will return a proper type for one set of parameters and nullptr for everything else. So, we need to enter a world of templates and that means compile time only! Let’s have a look at the following approach:

template <typename... Ts> 
unique_ptr<IRenderer>
create(const string &name, Ts&&... params)
{
if (name == "GL")
return construct<GLRenderer, Ts...>(forward<Ts>(params)...);
else if (name == "DX")
return construct<DXRenderer, Ts...>(forward<Ts>(params)...);

return nullptr;
}

We have a similar if construction, but now we forward parameters to the construct function. This the crucial part of the whole solution.

The first function template overload (when we cannot match with the argument list) is quite obvious:

template <typename Concrete, typename... Ts>
unique_ptr<Concrete> construct(...)
{
return nullptr;
}

The second:

template <typename Concrete, typename... Ts>
std::enable_if_t<has_constructor, std::unique_ptr<Concrete> >
constructArgs(Ts&&... params)
{
return std::make_unique<Concrete>(std::forward<Ts>(params)...);
}

(has_constructor is not a proper expression, will be defined later)

The idea here is quite simple: if our Concrete type has given constructor (matching the parameter list) then we can use this version of the function. Otherwise we fail and just return nullptr. So we have a classic example of SFINAE.

Let’s now look at the details… how to implement has_constructor ?

The details

Full code:
Online Compiler example

The real function definition looks like that:

template <typename Concrete, typename... Ts>
enable_if_t<decltype(test_has_ctor<Concrete, Ts...>(nullptr))::value, unique_ptr<Concrete> >
constructArgs(Ts&&... params)
{
return std::make_unique<Concrete>(std::forward<Ts>(params)...);
}

test_has_ctor tests if the Concrete type has the matching parameters:

template <typename U>
std::true_type test(U);

std::false_type test(...);

template <typename T, typename... Ts>
std::false_type test_has_ctor(...);

template <typename T, typename... Ts>
auto test_has_ctor(T*) -> decltype(test(declval< decltype(T(declval<Ts>()...)) >()));

Looks funny… right? :)

The core part is the matching:

decltype(test(declval<decltype(T(declval<Ts>()...)) >()))

In this expression we try to build a real object using given set of parameters. We simply try to call its constructor. Let’s read this part by part:

The most outer decltype returns the type of the test function invocation. This might be true_type or false_type depending on what version will be chosen.

Inside we have:

declval<decltype(T(declval<Ts>()...)) >()

Now, the most inner part ‘just’ calls the proper constructor. Then we take a type out of that (should be T) and create another value that can be passed to the test function.

SFINAE in SFINAE… It’s probably better to look at some examples and what functions will be chosen.

If a type is invalid the SFINAE will occur in this constructor calling expression. The whole function will be rejected from the overload resolution set and we’ll just end up with test_has_ctor(...) that returns false_type.

If a type has the right constructor, the matching expression will properly build a object and it can be passed to test(U) function. And that will generate true_type in the end.

Full code:
Online Compiler example

Note: since C++14 you can use enable_if_t (with the _t suffix). This is a template alias that greatly reduces length on expressions. Look also for other similar aliases: with _t or _v suffixes in C++ type traits.

Final Thoughts

Although our solution works it’s still not that useful :) A valuable addition to that would be to parse an input string (or a script), generate types and values and then call a proper function. Like:

string s = "GL renderer tex.bmp 10 particles"
auto rend = create(s);

But that’s a whole other story.

Still, writing and understanding the described code was an great experiment. To be honest, I needed to write those two posts before: about SFINAE and follow up to get it right.
Once again many thanks goes to Matthew Vogt

Viewing all 325 articles
Browse latest View live