Sometimes you can find interesting stuff in your past projects!
One day I was thinking about new post topics for the blog, but somehow, I got not much energy to do it. So, I just browsed through my very old projects (that are actually listed in my portfolio site). Memories came back and I decided maybe it’s time to refresh the ancient code files!
This time let’s go into Matrix!
Intro
Near the end of 2003, after me and my friends watching all the Matrix Movies, we got all crazy about the trilogy (which ended at that time). One friend suggested that maybe I could do some animation related to the ‘matrix rain’ from the movie intro. I said “Why not!”.
The below clip shows Matrix Reloaded intro:
In the animation we go from simple ‘matrix rain’ into a complex 3d scene and then into the first scene of the actual movie.

There were (and still are) many screen savers and demos that are using the matrix effect idea. So I knew that implementing a simple rain of letters wouldn’t be that awesome. I needed something more. At the same time I realized that making full animation (like in the intro) is also beyond my capabilities - I couldn’t create that advanced clock/machinery 3d scene. But what if I could simplify this idea?
After some investigation, trials and errors I’ve decided to create a very simple 3d scene and put it behind the falling letters!
The showcase
So what we have here?
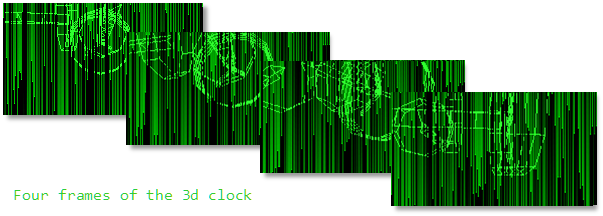
- There is a really simple 3d clock animation (it shows the current hour)
- Camera moves around
- The whole scene is projected using the matrix effect as a postprocessing
How it works
We have the following core parts:
- Setup
- Matrix rain
- 3d clock animation
- Postprocessing effect that renders glyphs
Setup
The demo uses Allegro Game library 4.03 for rendering, implemented in Dev Cpp, Windows.
We need an off-screen bitmap with the resolution of scr_w/font_width x scr_h/font_height. For example 1600/8 x 900/8 = 200x112 pixels. Initially, I used just a 8x8 system font, but I also experimented with matrix style font. For me, the system font looked actually better for this effect than the matrix font.
Please note, that we also need another off-screen bitmap, a buffer, that will be used for double buffering.
Matrix rain
Each column of the little off-screen bitmap has a particle that moves from top to the bottom. Each particle has an initial velocity, there is no gravity here. The particle is renderer with a fading trail:
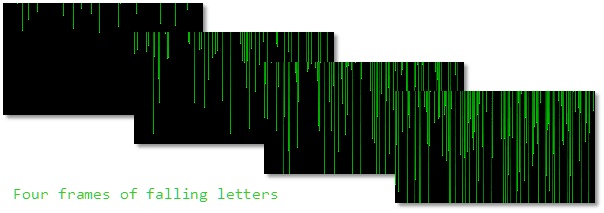
The letters are falling from the top, but in the real effect, if I am correct, they can start in the middle of a window… so this might be worth checking.
3d clock animation
Most of 3d code (Matrix calculation, rotations, camera) is written from scratch and uses only basic Allegro methods:
set_projection_viewport- spef from allegro 4.4.2 - stores the correct projection viewport of the scene.clip3d_f- spec from allegro 4.4.2 - this handles clipping, so I can just send my transformed vertices (before projection) and get clipped output.persp_project_f- spec from allegro 4.4.2 - does the final perspective projection using my camera and screen settings.
Then, we render models in wire-frame mode only and only in the places covered by lines (not empty, black space), so do_line is invoked there to put pixels in proper places - it just check if existing color is not zero (not black) and then puts a pixel:
voidPutLetter(BITMAP *bmp,int x,int y,int c)
{
if(x >=0&& x < bmp->w && y >=0&& y < bmp->h)
{
if(bmp->line[y][x]>0)
   bmp->line[y][x]= c;
}
}
Postprocessing
The current state of the effect looks quite horrible on its own, the resolution is not acceptable, the wire-frame model is too simple. But with postprocessing it gets a bit better shape.
The current mini buffer is copied into the back buffer, but each pixel is replaced by a glyph:
for(i =0; i < map->w; i++)
{
for(j =0; j < map->h; j++)
{
  txt[0]= letter;
  textout_ex(back_buffer, matrix_font, txt,
             i*font_width, j*font_height,// x, y
             map->line[j][i],0);
}
}
the letter is a char code that will be shown on the screen. We have actually several options here:
- random (originally implemented) - glyphs change every frame
- based on pos + color (glyphs don’t change) - this is what you can see in the compiled youtube clip.
- predefine: like when you press F2 you see ‘+Fen mode’ :)
Recompiling the old code
I was quite surprised that the original exe file worked well on my Win10 machine!. I could just double click on the file and play with the effect. Still, there were some problems with selecting a nice resolution.
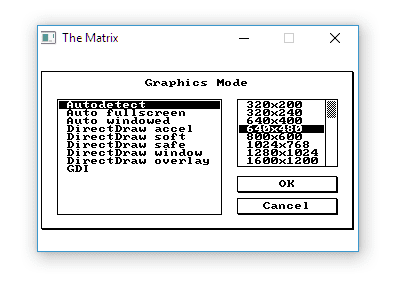
The above picture shows a default Allegro GFX mode selector UI. As you can see most of this is for windows/monitors with 4:3 aspect ratio! No HD option unfortunately. And, what’s more problematic: I couldn’t enable fullscreen mode.
I decided that it would be nice if I could get this working in HD resolution or at least give more options of sizes. But how to recompile this thing? Do I have those old tools… ?
Here’s what I’ve gathered:
- Allegro 5 contained a bit of breaking changes related to the version 4, so recompiling my old code (that used version 4.03 ) would be not that easy in the newest version.
- I’ve downloaded version 4.2.1 and only a few minor updates were needed
- DevCpp 4.9.2 is quite old and not updated any more, but you can grab Orwell DevCpp - http://orwelldevcpp.blogspot.com/
Somehow, after setting up the project one again, making sure you use proper compiler (MinGW, not TDM…) surprisingly I could play with the code!
Updates
I wanted to keep the old effect, but still some updates were made:
- code was a bit improved, but please don’t use it to learn C++! It’s quite old, C style coding, lots of global variables, bad variable naming…. but it works :D
- I’ve added option to pass window width and height as a command line params.
- There is a new option to stop camera animation - F4
- Show mini buffer - F5
- Initially all the glyphs were random (so there was a lot of flickering), I’ve changed it a bit so it uses a glyph based on x/y/col value.
Future ideas:
- Rewrite it to OpenGL… or maybe even WebGL. There is not much content to download, so it should be a tiny web app. We could use similar approach, render offscreen and then use postprocessing effect. Most of the things could be written in shaders. There are lots of such effects on shadertoy.
- Find better, matrix font
- Optimize: this is questionable actually. The effect runs pretty smoothly, even id Debug mode! I could optimize this as an exercise, but this wouldn’t be a huge gain.
Summary
GitHub Repo: https://github.com/fenbf/matrix - Please watch out for the code quality... it's really outdated! :)
Download the original exe file: link here
This was really great to play with this ancient project. It was more than 10 years (13 to be exact) when I’ve implemented the code. Fortunately, my programming skills improved and I write better code now. But in terms of creativity, at that time I was probably better at this. I’d love to return to writing such demos and little animations.
